This is the multi-page printable view of this section. Click here to print.
OpenStack IaaS
- 1: Announcements
- 2: Changelog
- 2.1: Changelog for OpenStack Train
- 2.2: Changelog for OpenStack Ussuri
- 2.3: Changelog for OpenStack Wallaby
- 2.4: Changelog for OpenStack Yoga
- 3: Overview
- 4: Getting started
- 5: Network
- 6: Guides
- 6.1: Affinity Policy
- 6.2: API access
- 6.3: Application credentials
- 6.4: Barbican
- 6.5: Billing
- 6.6: Detach & Attach interface on a Ubuntu instance
- 6.7: EC2 Credentials
- 6.8: Octavia
- 6.9: Swift Guides
- 6.9.1: Swift getting started
- 6.9.2: Swift projects
- 6.9.3: Swift S3 compatibility
- 6.10: Terraform Backend
- 6.11: User Management
- 6.12: Volume Guides
- 6.12.1: Volume Attachment Limits
- 6.12.2: Volume Backup & Restore
- 6.12.3: Volume migration
- 6.12.4: Volume Retype
- 6.12.5: Windows volume offline after restart
1 - Announcements
2026-03-31 Elastx Cloud Platform - Compute, Storage and DBaaS
Pricing adjustment
We have absorbed rising operational costs rather than pass them on to you. Despite significant inflationary pressure across the industry, we have managed to keep our prices stable.
The primary driver for our price adjustment is a sharp increase in hardware costs, which have risen 150–250% in the last 6 months. This is a market-wide development entirely outside our control, and one we have worked hard to shield you from for as long as possible. We have reached a point where continuing to do so would compromise our ability to maintain and develop the platform in a sustainable way.
Effective July 1, we will apply a 10% price adjustment to all Compute, Storage and DBaaS services.
We do not take this decision lightly. It is the first time we have increased the prices on most of these services, and it reflects the reality of today’s hardware market rather than any change in our commitment to you.
This change will take effect starting July 1, 2026.
Pricing adjustments
We will adjust the pricing on the following services.
| Service | Price increase |
|---|---|
| Compute | 10% |
| Block storage | 10% |
| Object Storage | 10% |
| DBaaS | 10% |
2026-02-04 ECP OpenStack IaaS
Mandatory idp for OpenStack IaaS
For a better and more secure user experience we will require all users in OpenStack IaaS to authenticate against the Elastx identity provider (IdP). Multi Factor Authentication (MFA) is required and you can use either TOTP or hardware keys in combination with a password. This is also a preparation for the launch of the Elastx Cloud Console (ECC). With the Elastx IdP you will have one account to access all ECP services.
If you do not already have an Elastx IdP account one will be created for you automatically at 2026-03-30. At this time we will no longer support OpenStack user accounts with Keystone Credentials. The ability to manage users in the OpenStack web UI will also be replaced with user management in Elastx Cloud Console. If you want to enable idp for your user account before this date please contact our support.
All programmatic integrations with OpenStack IaaS must be done with “application credentials”or “ec2 credentials”. If you are currently using a user account with Keystone Credentials (username and password), that integration will fail after all users are migrated to IdP authentication with MFA. This includes integrations with Swift Object storage which is the most common service to integrate with. Here is a guide on how to create application credentials, https://docs.elastx.cloud/docs/openstack-iaas/guides/application_credentials/. Here is a guide on how to create ec2 credentials, https://docs.elastx.cloud/docs/openstack-iaas/guides/ec2_credentials/.
This change will take effect starting March 30, 2026.
2025-09-29 Elastx Compute and Storage
v1 pricing adjustments
We have successfully avoided a general price increase on all services, even though the past years of high inflation. We are investing in new more efficient technology to compensate for the increased operational costs. This is the first time we will increase the price on our first generation compute and volume storage. We have come to a point where we need to do a price adjustment to be able to continue the platform development in a sustainable way. The cost for our second generation (v2) compute and volume storage will stay the same.
The new pricing will apply from 2026-01-01.
We will adjust the pricing on the following services.
| Service | Price increase |
|---|---|
| v1 compute flavors (All flavors starting with v1) | 4% |
| v1 volume types (4k-IOPS, 8k-IOPS, 16k-IOPS, v1-dynamic-40) | 4% |
2025-02-27 ECP Compute
Pricing adjustment
We are trying to avoid a general price increase on all services, even though the past years high inflation have been affecting us hard. We are investing in new more efficient technology to compensate for the increased cost derived from product vendors, utility services, financial service and internal costs. We have identified a few selected services where we need to perform price adjustments to be able to continue the development in a sustainable way.
We will adjust the pricing on the following dedicated instance flavors.
| Flavor | Current price | New price |
|---|---|---|
| d2-c8-m120-d1.6k | 6 890 SEK / month | 7 845 SEK / Month |
| d3-c24-m240-d3.2k | 10 750 SEK / month | 13 450 SEK / Month |
All prices are per month (730h) and VAT excluded.
The new pricing will apply from 2025-06-01.
You can find information, specifications and pricing here, https://elastx.se/se/openstack.
2024-08-19 ECP Compute
New generation v2 flavors
We are excited to announce that the new v2 compute flavor is now available in our Openstack IaaS. This new flavor is based on the AMD EPYC processor. While the price remains comparable to the v1 compute flavor, you can expect up to double the CPU performance.
The v2 flavors are also available for our Database DBaaS and Kubernetes CaaS services. You can migrate your existing instances from v1 to v2 flavors.
This will take effect starting August 19, 2024.
You can find information, specifications and pricing here, https://elastx.se/se/openstack.
2024-04-29 ECP Block Storage
ECP storage price cut
We are happy to announce that we will perform a price cut on our next generation v2 volumes. We launched the v2 volumes at the end of 2023 and it has performed just as good as we had hoped.
The v2 volumes have marked leading performance and are very cost effective and now we will cut the price for volume performance which will make it a market leader. We are cutting the price for volume performance by 40%.
The new v2 Block Storage is available as Volumes in Openstack IaaS, DBaaS and as Persistent Volumes in Kubernetes CaaS.
These are the volume types and pricing.
| Volume type | IOPS | MBPS | Price / GB | Current Price / Volume | New Price / Volume |
|---|---|---|---|---|---|
| v2-1k | 1 000 | 64 | 0.78 kr | 0 kr | 0 kr |
| v2-4k | 4 000 | 128 | 0.78 kr | 300 kr | 180 kr |
| v2-8k | 8 000 | 256 | 0.78 kr | 700 kr | 420 kr |
| v2-16k | 16 000 | 384 | 0.78 kr | 1500 kr | 900 kr |
| v2-32k | 32 000 | 512 | 0.78 kr | 3 100 kr | 1860 kr |
| v2-64k | 64 000 | 1 024 | 0.78 kr | 6 300 kr | 3780 kr |
| v2-128k | 128 000 | 2 048 | 0.78 kr | 12 700 kr | 7620 kr |
All prices are per month (730h) and VAT excluded.
This will apply from 2024-06-01. As a customer you do not need to do anything, the new pricing will be applied and visible on the next invoice.
You can find information, specifications and pricing here, https://elastx.se/se/openstack.
2023-12-20 ECP Block Storage
New v2 Volumes
We are happy to announce our next generation Elastx Cloud Platform (ECP) v2 Block Storage. Due to a technology shift we are now able to provide a market leading Block Storage in both price and performance.
There is a fully redundant storage cluster in each Availability Zone (AZ). Volumes are only accessible from compute instances running in the same AZ. All volumes are encrypted at rest. Snapshot and backup features are available.
The new v2 Block Storage is now available as Volumes in Openstack IaaS and it will soon be available as Persistent Volumes in Kubernetes CaaS and volumes in DBaaS.
These are the volumes and pricing that are currently available.
| Volume type | IOPS | MBPS | Price / GB | Price / Volume |
|---|---|---|---|---|
| v2-1k | 1 000 | 64 | 0.78 kr | 0 kr |
| v2-4k | 4 000 | 128 | 0.78 kr | 300 kr |
| v2-8k | 8 000 | 256 | 0.78 kr | 700 kr |
| v2-16k | 16 000 | 384 | 0.78 kr | 1500 kr |
| v2-32k | 32 000 | 512 | 0.78 kr | 3 100 kr |
| v2-64k | 64 000 | 1 024 | 0.78 kr | 6 300 kr |
| v2-128k | 128 000 | 2 048 | 0.78 kr | 12 700 kr |
All prices are per month (730h).
Deprecated v1 Volumes
The new v2 Volumes are more cost effective and more powerful than the current v1 volumes. Therefore we are now deprecating the following v1 volumes:
- v1-dynamic-40
- 8k-IOPS
- 16k-IOPS
These Volumes will be available at least one year from now. We will announce an End Of Life date at least three months ahead of termination.
Migration to the new v2 Volumes can be done by mounting them in parallel and copying data or using the volume retype function which is an offline data migration tool.
You can find information, specifications and pricing here, https://elastx.se/se/openstack.
2023-05-02 OpenStack IaaS announcement
We are happy to announce these platform news that will help you to run applications on Elastx Cloud Platform with enhanced security.
Object Storage Encryption at Rest
Swift, Elastx object storage in OpenStack, is now fully Encrypted at Rest. We have migrated all data to encrypted disks. You do not need to do anything, both current data and new data is now Encrypted at Rest.
If you have a requirement to encrypt data at rest you can now consume any of our storage services. All storage services in Elastx Cloud Platform, both ephemeral, volume and object storage are now Encrypted at Rest.
Encryption at Rest has been active on Elastx object storage since 2023-04-14
2023-04-26 OpenStack IaaS announcement
Removed dedicated flavor
The following dedicated instance flavor is no longer available:
- d2-c8-m120-d11.6k
2023-03-22 OpenStack IaaS announcement
We are changing the Microsoft licensing model to make it more cost effective and we have also introduced new Load Balancer flavors that have more capacity.
New Microsoft licensing model
We are changing the way we charge for Microsoft licenses in OpenStack IaaS to better align with how Microsoft charges for these licenses and to make it more cost effective for high memory instances. Until now we have based the MS server licenses on the amount of instance RAM. The new license model will be based on the number of instance CPUs which also aligns better with how you typically buy these licenses.
| License | Current Price | New Price |
|---|---|---|
| Microsoft Windows Server | 36.5 SEK / GB RAM / Month | 189 SEK / CPU / Month |
| Microsoft MSSQL Standard | 197.1 SEK / GB RAM / Month | 1229 SEK / CPU / Month |
| Microsoft MSSQL Enterprise | 4821 SEK / CPU / Month | |
| Microsoft MSSQL Web Edition | 79 SEK / CPU / Month |
You need to license at least 4 CPUs per instance for Microsoft MSSQL server. MSSQL licenses are billed per month and any usage change needs to be reported to Elastx Support.
The new pricing will apply from 2023-05-01
New Load Balancer flavors
We have added multiple OpenStack Load Balancer flavors with more capacity to allow more demanding workloads. Until now we have provided a single flavor for all Load Balancers but now you can select a Load Balancer with more capacity if required.
| Load Balancer Flavor | Price per hour | Price per month |
|---|---|---|
| v1-lb-1 (default) | 0.53 kr | 386.90 kr |
| v1-lb-2 | 1.06 kr | 773.80 kr |
| v1-lb-4 | 2.12 kr | 1,547.60 kr |
| v1-lb-8 | 4.24 kr | 3,095.20 kr |
This is a general guideline on traffic capacity but it can differ based on traffic pattern.
v1-lb-1 approximately 200Mbit
v1-lb-2 approximately 400Mbit
v1-lb-4 approximately 800Mbit
v1-lb-8 approximately 1.6Gbit
The new Load Balancer Flavors are available now.
2023-01-27 Elastx Cloud Platform pricing adjustment
To Elastx Customers and Partners,
We are trying to avoid a general price increase on all services, even though the current high inflation is affecting us hard. We are investing in new more efficient technology to compensate for the increased cost derived from product vendors, utility services, financial service and internal costs. We have identified a few selected services where we need to perform price adjustments to be able to continue the development in a sustainable way.
The new pricing will apply from 2023-03-01.
We will adjust the pricing on the dedicated instance flavor d1-c8-m58-d800.
| Flavor | Current price | New price |
|---|---|---|
| d1-c8-m58-d800 | 3950 SEK / Month | 4750 SEK / Month |
We will adjust the pricing on the network Load Balancer as a Service.
| Service | Current price | New price |
|---|---|---|
| Load Balancer as a Service | 250 SEK / Month | 390 SEK / Month |
2022-09-30 Openstack encrypted volumes and deprecated flavor
During 2021 we announced that all volumes in OpenStack are encrypted at no additional cost. We are now changing the end of life date of our legacy encrypted volume types.
We are also deprecating our first dedicated instance flavor. No end of life date will be announced today but there will be limited availability as we will not add any additional capacity.
Encrypted Volumes EOL update
During 2021 we enabled encryption at rest for all volumes in our Openstack IaaS. Prior to this change you could select encryption as an option which cost more than non encrypted volumes. Now all new and existing volumes are encrypted at no additional cost.
There is a function available in OpenStack to migrate data between volume types that can be used to migrate from a legacy encrypted volume to a standard volume type which also is encrypted at rest. We have users requesting to postpone the EOL date and therefore we are now announcing a new EOL date.
The following volume types are deprecated and will be disabled at the latest 2023-09-30.
- 4k-IOPS-enc
- 8k-IOPS-enc
- 16k-IOPS-enc
The price for these volume types will increase by 30% 2023-01-01.
If you are running any of the above volume types you need to migrate the data to other volume types.
When you migrate the legacy encrypted volumes to our standard volumes you will reduce the cost for your volumes. You can change the volume type from a legacy encrypted to a standard volume but it is an offline process. Please contact support if you need any help or recommendation on how to do this.
Deprecated dedicated flavor
The following dedicated instance flavor is now deprecated.
- d1-c8-m58-d800
- v1-dedicated-8 (legacy name)
We will not announce an End Of Life date today and when we do it will be announced at least one year ahead. We will not add any additional capacity to this flavor so there is limited availability. There can be situations where we do not have any available capacity to start new instances with this flavor.
This is also the only flavor that doesn’t have a boot disk with at rest encryption.
2022-06-15 Increased price on Openstack d2 instances
Due to the increased pricing on hardware and power we need to increase the price on d2 instances.
There has been an extreme price increase on hardware and power during the last 6 months which has forced us to increase the price on our OpenStack d2 dedicated instances. Both current and new instances with these flavors will be affected.
The following instances flavors are affected.
| Flavor | Current price | New price |
|---|---|---|
| d2-c8-m120-d1.6k | 5950 SEK / month | 6890 SEK / Month |
| d2-c8-m120-d11.6k | 8249 SEK / month | 9250 SEK / Month |
The new prices will apply from 2022-10-01.
2022-06-14 New OpenStack Instance flavors to better match your workloads.
Elastx is introducing new OpenStack Instance flavors and a new flavor naming standard. The new flavors are memory or cpu optimized flavors that can be used to better match your workload requirements. The new naming standard will make it easier to understand the flavor specification and to support additional flavor types in the future.
New Flavors
Here are all the new flavors that will be available soon.
| Flavor | vCPU | RAM | Disk |
|---|---|---|---|
| v1-c1-m8-d60 | 1 CPU | 8GB RAM | 60GB SSD Disk |
| v1-c2-m4-d60 | 2 CPU | 4GB RAM | 60GB SSD Disk |
| v1-c2-m16-d120 | 2 CPU | 16GB RAM | 120GB SSD Disk |
| v1-c4-m8-d120 | 4 CPU | 8GB RAM | 120GB SSD Disk |
| v1-c4-m32-d240 | 4 CPU | 32GB RAM | 240GB SSD Disk |
| v1-c8-m16-d240 | 8 CPU | 16GB RAM | 240GB SSD Disk |
| v1-c8-m64-d480 | 8 CPU | 64GB RAM | 480GB SSD Disk |
New naming standard
All flavors will get new names, the current flavors will still be available and new flavors with the new naming standard will be created in parallel. The cost for the new flavors will be the same as the current corresponding one.
Here is how the new naming standard works.
First character
v=vm (virtual machine on shared hypervisor)
d=dedicated (virtual machine on dedicated hypervisor)
b=bare metal (bare metal machine)
First number
#=hardware version
The following characters and numbers
c=vCPU amount
m=Memory in GB
d=disk in GB
g=gpu and type of GPU
s=sgx enabled and the amount of sgx RAM in GB
Here are the new naming on the corresponding current flavors
| Flavor | vCPU | RAM | Disk | Current |
|---|---|---|---|---|
| v1-c1-m0.5-d20 | 1 CPU | 0.5GB RAM | 20GB SSD Disk | v1-micro-1 |
| v1-c1-m1-d20 | 1 CPU | 1GB RAM | 20GB SSD Disk | v1-mini-1 |
| v1-c1-m2-d20 | 1 CPU | 2GB RAM | 20GB SSD Disk | v1-small-1 |
| v1-c1-m4-d40 | 1 CPU | 4GB RAM | 40GB SSD Disk | v1-standard-1 |
| v1-c2-m8-d80 | 2 CPU | 8GB RAM | 80GB SSD Disk | v1-standard-2 |
| v1-c4-m16-d160 | 4 CPU | 16GB RAM | 160GB SSD Disk | v1-standard-4 |
| v1-c8-m32-d320 | 8 CPU | 32GB RAM | 320GB SSD Disk | v1-standard-8 |
| d1-c8-m58-d800 | 8 CPU | 58GB RAM | 800GB SSD Disk | v1-dedicated-8 |
| d2-c8-m120-d1.6k | 8 CPU | 120GB RAM | 1600GB SSD Disk | v2-dedicated-8 |
| d2-c8-m120-d11.6k | 8 CPU | 120GB RAM | 11600GB SSD Disk | d2-dedicated-8 |
The new flavors will be available from 2022-06-20.
2022-06-13 Reducing OpenStack volume price with up to 63% and increasing performance with up to 50%.
Elastx is introducing a new volume type that will be more cost effective and can also improve performance with up to 50%. We will also adjust the pricing on some of the current volume types with up to 63% without any change in service levels.
Our OpenStack IaaS volumes are based on redundant SSD persistent storage clusters which are available in all our three availability zones. Our storage clusters are battle proven and have been running with predictable performance and without interruption for almost 10 years! During this period we have expanded, made hardware refreshes and enabled encryption, all without disruption.
New volume type “v1-dynamic-40”
The new volume type is called “v1-dynamic-40”. The performance is dynamic which means iops will be provisioned depending on the size of the volume. There will be a base provisioned iops and then added iops performance for each added GB in size up to a maximum level. The new dynamic volume type will cost less and perform better than the current entry level volume type “4k-IOPS”. This new volume type and all our current volumes are encrypted at rest.
V1-dynamic-40 volume
Base provisioned iops: 4000
Additional iops per GB: 40
Max iops: 24000
Price per GB: 2.90 SEK/GB/month
Base price per volume: 0 SEK/month
Example, a 400GB volume will have 20000 iops (4000+400*40) and cost 1160 SEK / month.
The new “v1-dynamic-40” volume will be available 2022-06-20.
Price change on current volumes.
We will adjust the price on our current static iops volumes to be more cost effective and be aligned with the cost to provisioned iops. These static volumes have a higher base provisioned iops and do not increase in iops performance. To match this with the cost we will lower the price per GB and introduce a base cost for the higher base performance.
8k-IOPS volume
Base provisioned iops: 8000
Additional iops per GB: 0
Max iops: 8000
Price: 2.50 SEK/GB/month
Base price per volume: 150 SEK/month
Example, a 100GB volume will have 8000 iops and cost 400 SEK / month (150+100*2.5).
16k-IOPS volume
The legacy encrypted volumes are deprecated as all volumes are encrypted now.
Base provisioned iops: 16000
Additional iops per GB: 0
Max iops: 16000
Price: 2.50 SEK/GB/month
Base price per volume: 290 SEK/month
Example, a 100GB volume will have 16000 iops and cost 540 SEK / month (290+100*2.5).
8k-IOPS-enc volume (deprecated)
The legacy encrypted volumes are deprecated as all volumes are encrypted now.
Base provisioned iops: 8000
Additional iops per GB: 0
Max iops: 8000
Price: 4.30 SEK/GB/month
Base price per volume: 150 SEK/month
Example, a 100GB volume will have 8000 iops and cost 580 SEK / month (150+100*4.3).
16k-IOPS-enc volume (deprecated)
Base provisioned iops: 16000
Additional iops per GB: 0
Max iops: 16000
Price: 4.30 SEK/GB/month
Base price per volume: 290 SEK/month
Example, a 100GB volume will have 16000 iops and cost 720 SEK / month (290+100*4.3).
The new pricing will be applied from 2022-09-01.
Deprecated volume type
The “4k-IOPS” volume is now deprecated. It will still be available as long as it is in use but we will limit creation of new volumes 2022-12-01. The new volume type v1-dynamic-40 costs less and is faster so we recommend changing current 4k-IOPS volumes to it.
Changing volume type
The volume type on a current volume can be changed without disruption and the new specifications will be applied instantly.
2022-01-17
We are happy to announce that all volumes in OpenStack are now encrypted at no additional cost and we will soon start the upgrade of the OpenStack version with new features and improvements.
Encrypted Volumes
Our goal is to provide the best conditions and tools to run applications in a secure and predictable way. During 2021 we enabled encryption at rest for all volumes in our Openstack IaaS. Prior to this change you could select encryption as an option which cost more than non encrypted volumes. Now all new and existing volumes are encrypted at no additional cost. The option to select encrypted volumes is now obsolete and will be removed shortly.
The following volume types are deprecated and will be disabled 2022-09-30.
4k-IOPS-enc
8k-IOPS-enc
16k-IOPS-enc
If you are running any of the above volume types you need to migrate the data to other volume types.
When you migrate the legacy encrypted volumes to our standard volumes you will reduce the cost for your volumes. You can’t change the volume type from a legacy encrypted to a standard volume, you need to create a new volume and migrate the data. Please contact support if you need any help or recommendation on how to do this.
OpenStack IaaS upgrade
We will soon upgrade our OpenStack platform and this will be performed in three steps. The plan is to start the upgrade in February. We will announce service windows for the upgrade on our status page, https://status.elastx.se. Here you can also subscribe to get notifications about service windows and incidents.
Step 1
OpenStack version will be upgraded to Rocky. There will be disturbance with the OpenStack API but we do not expect any disturbance on running workloads.
Step 2
Upgrade operating system on control plane and compute nodes.
There will be disruption of workloads during the upgrade. We will upgrade one availability zone at a time.
Step 3
OpenStack version will be upgraded to Train. There will be disturbance with the OpenStack API but we do not expect any disturbance on running workloads.
2 - Changelog
2.1 - Changelog for OpenStack Train
Changelog overview
The purpose of this upgrade is to take the OpenStack platform from the current “Queens” release to the “Train” release. This will include an intermediate upgrade to the “Rocky” release. The “Stein” release is skipped because it isn’t required.
- No public APIs are deprecated by these upgrades
- Support for TLS version 1.1 will be dropped during the upgrade to the “Train” release
Deprecations and dropped support
APIs
None of the public OpenStack APIs will be deprecated by the planned upgrades.
TLS
Support for TLS version 1.1 will be dropped during the upgrade to the “Train” release. This will cause issues for API clients only supporting TLS version 1.1 or below as connections will be rejected. Upgrade and check client configuration before the upgrades!
Horizon (Web UI)
You will no longer be able to download “OpenStack RC File v2” by clicking your username in the top right corner. Only “OpenStack RC File v3” will be available.
Visible changes (Horizon/web UI)
- The “Overview” page will be divided into categories by resource type. It will also contain information about more resources.
- “Server Groups” are now visible under the “Compute” heading.
- “Consistency Groups” and “Consistency Groups Snapshots” have been replaced by “Groups” and “Group Snapshots” under the “Volume” heading.
- It is now possible to manage “Application Credentials” under the “Identity” heading.
New features
The upgrades come with a lot of new features, such as:
- UDP load balancers in Octavia (Train)
- Fine grained access rules can now be defined for “Application Credentials” (Train)
Reference
To get the complete picture you may refer to the release notes found here for the following projects:
2.2 - Changelog for OpenStack Ussuri
Changelog overview
The purpose of this upgrade is to take the OpenStack platform from the current Train release to the Ussuri release.
- No public APIs deprecations
- API endpoints are now available over IPv6 (note that IPv6 for compute and loadbalancers is still unsupported)
Deprecations and dropped support
APIs
None of the public OpenStack APIs will be deprecated by the planned upgrades.
New features
The upgrades come with a lot of new features, such as:
- API endpoints are now available over IPv6
- Barbican secrets can now be removed by other users with the Secret Store permission (previously only the creator of the secret could remove it).
Reference
The complete list of changelogs can be found here, and the changelogs for the major projects we use can be seen below.
Please note that not all of the changes may be relevant to our platform.
2.3 - Changelog for OpenStack Wallaby
Changelog overview
- Cinder v2 API disabled
- This upgrade contains several security fixes, bugfixes and improvements as well as some new minor features.
Deprecations and dropped support
APIs
- Cinder v2 API, that was deprecated in the Pike release, will be removed
Reference
The complete list of changelogs can be found here, and the changelogs for the major projects we use can be seen below.
Please note that not all of the changes may be relevant to our platform.
2.4 - Changelog for OpenStack Yoga
Changelog overview
- No public APIs deprecations
- This upgrade contains several security fixes, bugfixes and improvements as well as some new minor features.
Reference
The complete list of changelogs can be found here, and the changelogs for the major projects we use can be seen below.
Please note that not all of the changes may be relevant to our platform.
3 - Overview
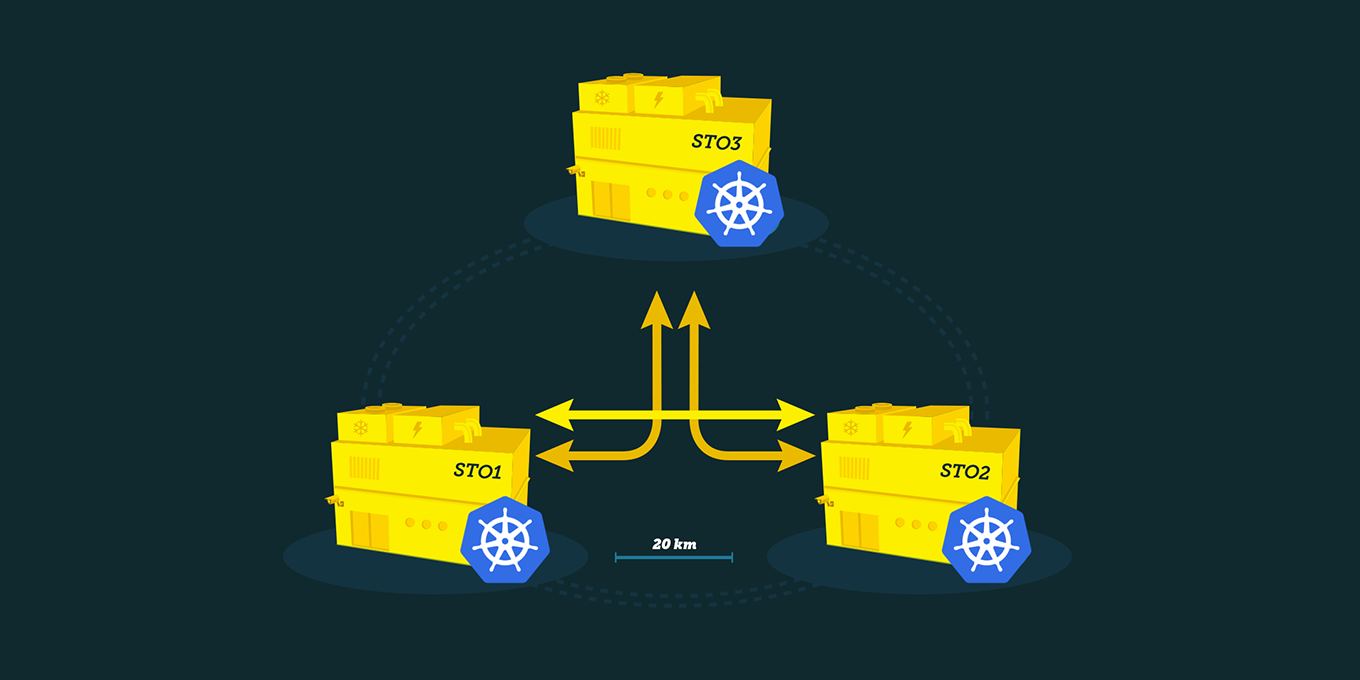
ELASTX OpenStack IaaS consists of a fully redundant installation spread over three different physical locations (openstack availability zones) in Stockholm, Sweden. Managed and monitored by us 24x7. You also have access to our support at any time.
The current setup is based on the OpenStack version Yoga.
Services
Our OpenStack environment currently runs the following services:
- Keystone - Authentication service
- Nova - Compute service
- Neutron - Network service
- Heat - Orchestration service
- Horizon - Dashboard
- Glance - Image store. We provide images for the most popular operating systems. All Linux images are unmodified from the official vendor cloud image.
- Barbican - Secret store service which is powered by physical HSM appliances
- Octavia - Load balancer service, barbican integration for SSL termination
- Cinder - Block storage with SSD based block storage and guaranteed IOPS reservations which is integrated with Barbican for optional encrypted volumes.
- Swift - Object storage
- Ceilometer - Metric storage, stores key metrics for the services like cpu and memory utilization
- CloudKitty - Rating service
Quotas
These are our default project quotas, let us know if you wish to change these upon ordering. Contact support to have quotas changed on an existing project.
- VCPUs: 20
- Memory (RAM) 50 GiB
- Volumes: 1000
- Volume snapshots: 1000
- Total size of volumes and snapshots: 1000 GiB
- Security groups: 50
- Security group rules: 1000
- Floating IPs: 10
- Routers: 1
- Networks: 10
- Subnets: 100
- Ports: 500
Differencies and limitations
As every OpenStack cloud has it’s own unique set of features and underlying infrastructure, there are some things that might differentiate in our cluster from others. Down below is a list of what we believe is good to know when working in our OpenStack cloud.
Compute
- Live migration is not supported.
- An instance with volumes attached cannot be migrated to another Availability Zone.
- Machines booting from ephemeral storage cannot use an image larger than 64GiB, especially important if booting from snapshot.
- Machines created with machine type q35, for instance our Windows UEFI images, can only attach one volume while the instance is running. To attach additional volumes, the instance needs to be turned off first.
Dashboard
- Objects in Object store cannot be listed in Horizon once an account has >1000 buckets or >10000 objects in it.
API access
Here is a list of all the Openstack IaaS API endpoints. Make sure you allow traffic to these ports in your firewall.
- Cloudformation https://ops.elastx.cloud:8000
- Compute https://ops.elastx.cloud:8774
- Identity https://ops.elastx.cloud:5000
- Image https://ops.elastx.cloud:9292
- Key Manager https://ops.elastx.cloud:9311
- Load Balancer https://ops.elastx.cloud:9876
- Metric https://ops.elastx.cloud:8041
- Network https://ops.elastx.cloud:9696
- Object Store https://swift.elastx.cloud:443
- Orchestration https://ops.elastx.cloud:8004
- Placement https://ops.elastx.cloud:8780
- Rating https://ops.elastx.cloud:8089
- Registration https://ops.elastx.cloud:5050
- Volumev3 https://ops.elastx.cloud:8776
Load Balancing
- It’s not possible to limit access to a Load Balancer instance with a Floating IP attached to it.
- A Load Balancer cannot be referenced by ID as a source in a Security Group.
Network
- Maximum of one router per project. We only support a single router due to how resources are allocated in our network infrastructure.
- An instance cannot connect to its own Floating IP. Best practice is to use internal IP when communicating internally (e.g. clustering).
- The network
elx-public1is provided by the platform and cannot be removed from a project. You can attach an interface on your router on this network for internet access. This is also used as a pool for requesting Floating IP addresses. - A known limitation exists in Horizon where security groups cannot be directly assigned to network ports. Use the OpenStack CLI to assign security groups to network ports directly or add the security group to the instance rather than to the network port.
Object store
- To upload objects larger than 5GiB, use of DLO/SLO is necessary to split the object in multiple smaller parts. See https://docs.openstack.org/swift/latest/overview_large_objects.html.
- python-swiftclient is not correctly adding headers to segmented files which cause fragments to remain when using ‘X-Delete-After’ header to automatically delete objects after a certain time has passed. This isn’t unique to our cloud but we feel that it’s important to know. See https://bugs.launchpad.net/python-swiftclient/+bug/1159951.
Secrets
- Secrets can only be deleted by the user that created them.
Storage
- Volumes cannot be attached nor migrated across Availability Zones.
- Encrypted volumes can only be deleted by the user that created them.
- It’s not supported to snapshot the ephemeral volume of dedicated instances (flavour with dedicated in name).
- Encrypted volumes need to be detached and attached manually for instances to discover the new volume size when resizing.
- When making a backup use only single line for description. There is a bug that fails the process if you use more than one line.
4 - Getting started
This guide goes through the initial steps on how to get started with creating instances and accessing them via ssh.
In this example we use an ubuntu image and restrict SSH access.
Create Network
- Go to “Project” > “Network” > “Networks”
- Select “Create Network” > set a network name > “Next”
- Set subnet name and network address (10.0.1.0/24 for example) > “Next”
- Make sure that “Enable DHCP” is checked.
- Add “DNS Name Servers” > “Create” (ip of a resolver e.g. dns4eu, Cloudflare, or other depending on your privacy and policy preferences).
Create Router
- Go to “Project” > “Network” > “Routers”
- Select “Create Router” > set a router name and select the public network “elx-public1” > “Create Router”
- Select the router you just created > “Interfaces” > “Add Interface” > select the subnet you created > “Add Interface”
Now the network is up and ready for you to create the first instance.
Create ssh key
- Go to “Project” > “Compute” > “Key Pairs”
- Select “Create Key Pair” > set key pair name > “Create Key Pair”
- Select Key Type -> “SSH Key”
- Save the private key
Create Security Group
- Go to “Project” > “Network” > “Security Groups”
- Select “Create Security Group” > set a name > “Create Security Group”
- Select “Manage Rules” on the security group you created"
- Add IP address under “CIDR” to restrict access > “Add” (e.g. 215.1.1.1/32 to only allow this one IP)
- Select “Add Rule” > set “Port” 22 > add an IP address under “CIDR” to restrict access > “Add”
Create instance
- Go to “Project” > “Compute” > “Instances”
- Select “Launch Instance” > Set instance name > Specify Availability Zone > “Next”
- Select “Image” in “Select Boot Source” > Select “No” in “Create New Volume”
- Select image (ubuntu-24.04-server-latest for example) > “Next”
- Select a flavor (v2-c1-m0.5-d20 for example) > “Next”
- Your network should already be selected > “Next”
- You do not need to select any port > “Next”
- Add the security group you created earlier > “Next”
- The key pair you created earlier should already be selected.
- “Launch instance”
Specifying the Availability Zone is important if you plan on using volumes, as these can’t be attached nor migrated across Availability Zones
Add a public IP to the instance
- Go to “Project” > “Compute” > “Instances” > from the “Actions” menu on the instance you created select “Associate Floating IP”
- Select the “+” button next to the “IP Address” field
- Select “Pool” “elx-public1” > “Allocate IP”
- “Associate”
Log in to your new instance
Use the floating IP and the ssh key you created.
In this example the ssh key pair I created was named mykeypair and the public ip is “1.2.3.4” and the image I used was an Ubuntu image. In this example:
ssh -i mykeypair.pem ubuntu@1.2.3.4
The username is different depending on the Linux flavor you are using but you will always use the keypair and not a password.
This is the generic pattern to login from a Linux client:
ssh -l UserName -i /path/to/my-keypair.pem 1.2.3.4
Default UserName is different depending on distribution:
| Linux Distribution | User |
|---|---|
| AlmaLinux | almalinux |
| CentOS 8-stream | centos |
| CentOS 9-stream | cloud-user |
| Rocky Linux | rocky |
| CoreOS | core |
| Fedora | fedora |
| Redhat | cloud-user |
| Ubuntu | ubuntu |
| Debian | debian |
| Heat instances* | ec2-user* |
- When using Heat to deploy instances the user name will be ec2-user instead.
Changing the default username
In most modern distributions it’s also possible to change the default username when creating a server by utilizing cloud-init.
The sample configuration below would change the deafult username to “yourusername”.
#cloud-config
system_info:
  default_user:
    name: yourusername
5 - Network
Overview
The OpenStack tenant networks is implemented as a shared L2 between all availability zones and is tightly integrated with our network infrastructure. Routing is handled by anycast routing in the switch infrastruture which makes the network extremely performant with low consistent latency.
Special considerations
Router Egress NAT
Egress NAT is distributed and handled by the local hypervisor which means that unless a floating ip is associated with a instance it will utilize the public ip-address of the hypervisor where the instance is currently running. If the public ip-address of the instance needs to be known, e.g. needs to be provided to a 3rd party for firewall rules or likewise a floating ip needs to be associated with the instance.
Router Extra Routes API
The current network design does not yet support the use of Extra Routes in Neutron routers. You can configure Extra Routes in both API and Horizon but they will not be applied to datapath. There are possible workarounds depending on what needs to be accomplished.
Neutron ports with allowed-address-pair
The current network design does not yet fully support the use of allowed-address-pair to utilize instances as a gateway for network traffic (e.g. VPN servers). It does currently work for single addresses (/32 prefix) only.
Multicast
Multicast traffic Inter-AZ works but is without any guarantee.
VIP-address
ARP lookups are asynchronous Inter-AZ. When moving VIP-addresses between AZs this can lead to unexpected traffic patterns.
6 - Guides
6.1 - Affinity Policy
Overview
Here is how to avoid that groups of instances run on the same compute node. This can be relevant when configuring resilience.
-
Create an anti affinity group.
Take note of the group UUID that is displayed when created. It is needed when deploying the instance.
openstack server group create --policy anti-affinity testgrouphttps://docs.openstack.org/python-openstackclient/yoga/cli/command-objects/server-group.html
-
(Optional) Read out the affinity policies.
openstack server group list | grep -Ei "Policies|affinity" -
Add the instance to the group when deploying.
openstack server create --image ubuntu-20.04-server-latest --flavor v1-small-1 --hint group=<server_group_uuid> test-instancehttps://docs.openstack.org/python-openstackclient/yoga/cli/command-objects/server.html
Additional links
https://docs.openstack.org/senlin/yoga/user/policy_types/affinity.html
6.2 - API access
Introduction
OpenStack provides REST APIs for programmatic interaction with the various services (compute, object storage, etc.). These APIs are used by automation tools such as HashiCorp Terraform and the OpenStack CLI utility.
For advanced programmatic usage, there exist freely available SDKs and software libraries for several languages which are maintained by the OpenStack project or community members.
This guides describes the initial steps required for manual usage of the OpenStack REST APIs.
Authentication
Usage of an application credential for API authentication is recommend due to their security and operational benefits.
Listing endpoints
API endpoints for the OpenStack services can be listed by navigating to “Project” → “API Access” in the Horizon web console or by issuing the following command:
$ openstack catalog list
Endpoints marked as “public” in the command output are intended for customer usage.
Reference documentation
For detailed usage of the of the APIs, see the official OpenStack API reference documentation.
6.3 - Application credentials
6.3.1 - Application credentials
Overview
This guide will help you getting started with OpenStack application credentials. Application credentials are designed to be used by automation and CLI tools, such as Terraform and the OpenStack command-line client.
Create application credential using web dashboard
Navigate to “Identity” → “Application Credentials” in your target project and press “Create Application Credential”. Once created, you’ll be offered to download the generated credential configuration as an OpenStack RC file (“openrc” version 3) or in the “clouds.yaml” format.
Create application credential using CLI
Note: If you access the CLI already using an application credential, you will not be able to create additional applications credentials unless the one you are accessing with was created with the unrestricted option.
Beware: Please take notes of the risks that entails setting the unrestricted option. This might not be suitable for certain use cases as it allows to regenerate/create application credentials with all the permissions set.
To create a pair of application credentials run the openstack application credential create <name> command. By default the same access as the user running the command will be given. If you wish to override the roles given add --role <role> for each role you want to add.
You can also set an expiration date when creating a pair of application credentials, add the flag --expiration followed by a timestamp in the following format: YYYY-mm-ddTHH:MM:SS.
For more detail you can visit the OpenStack documentation that goes more into detail on all avaible options.
An example that will give access to the most commonly used APIs:
openstack application credential create test --role _member_ --role creator --role load-balancer_member

+--------------+----------------------------------------------------------------------------------------+
| Field        | Value                                                                                  |
+--------------+----------------------------------------------------------------------------------------+
| description  | None                                                                                   |
| expires_at   | None                                                                                   |
| id           | 3cd933bbcf824bdc9f77f37692eea60a                                                       |
| name         | test                                                                                   |
| project_id   | bb301d6172f54d749f9aa3094d77eeef                                                       |
| roles        | _member_ creator load-balancer_member                                                  |
| secret       | ibHyYuIPQCf-IKVN0qOEAgf4CNvDWmT5ltI6mdbmUTMD7OvJTu-5nXX0U6_5EOXTKriq7C7Ka06wKmJa0yLcKg |
| unrestricted | False                                                                                  |
+--------------+----------------------------------------------------------------------------------------+
Beware: You will not be able to view the secret again after creation. In case you forget the secret you will need to delete and create a new pair of application credentials.
Create an openrc file
#!/usr/bin/env bash
export OS_AUTH_TYPE=v3applicationcredential
export OS_AUTH_URL=https://ops.elastx.cloud:5000/v3
export OS_APPLICATION_CREDENTIAL_ID="<ID>"
export OS_APPLICATION_CREDENTIAL_SECRET="<SECRET>"
export OS_REGION_NAME="se-sto"
export OS_INTERFACE=public
export OS_IDENTITY_API_VERSION=3
Available roles
Below you will find a table with available roles and what they mean.
| Role name | Description |
|---|---|
_member_ |
Gives access to nova, neutron and glance. This allowed to manage servers, networks, security groups and images (this role is currently always given) |
creator |
Gives access to barbican. The account can create and read secrets, this permission is also requierd when creating an encrypted volumes |
heat_stack_owner |
Gives access to manage heat |
load-balancer_member |
Gives access to create and manage existing load-balancers |
swiftoperator |
Gives access to object storage (all buckets) |
List application credentials using CLI
To list all existing application credentials available in your project you can run the openstack application credential list command.
Example:
openstack application credential list

+----------------------------------+------+----------------------------------+-------------+------------+
| ID                               | Name | Project ID                       | Description | Expires At |
+----------------------------------+------+----------------------------------+-------------+------------+
| 3cd933bbcf824bdc9f77f37692eea60a | test | bb301d6172f54d749f9aa3094d77eeef | None        | None       |
+----------------------------------+------+----------------------------------+-------------+------------+
Show application credential permissions using CLI
To show which permissions a set of application credentials have you can run the openstack application credential show command followed by the ID of the credential you want to inspect.
Example:
openstack application credential show 3cd933bbcf824bdc9f77f37692eea60a

+--------------+------------------------------------------------------------------------------------+
| Field        | Value                                                                              |
+--------------+------------------------------------------------------------------------------------+
| description  | None                                                                               |
| expires_at   | None                                                                               |
| id           | 3cd933bbcf824bdc9f77f37692eea60a                                                   |
| name         | test                                                                               |
| project_id   | bb301d6172f54d749f9aa3094d77eeef                                                   |
| roles        | creator load-balancer_member _member_                                              |
| unrestricted | False                                                                              |
+--------------+------------------------------------------------------------------------------------+
Delete application credentials using CLI
To delete a pair of application credentials enter the openstack application credential delete command followed by the ID of the credentials you want to remove.
Example:
openstack application credential delete 3cd933bbcf824bdc9f77f37692eea60a
6.3.2 - Application credentials - Access Rules
Overview
This guide will help you get started with how to create different access rules for various resources in OpenStack. The access rules are applied to application credentials and enables a way to set more fine-grained access control for applications to specific resources.
Good to know
Access rules are only applicable to application credentials and not to users of a project. As an example, a user can create an application credential that has read-only access to a specific container in Swift. This type of credentials can later be used by an application to read information from that container. The users within the project can still access all containers with read/write access, if they are a member of the swift operator role. The users also has access to other types of resources, such as virtual machines. If you want to completely separate user access from virtual machines and swift, you can opt-in for a separate swift project. Please see here for more information.
To see more information about the different user roles in our OpenStack, you can find it here.
For more information about application credentials, you find it here
Creating Acces Rules
Access rules are built by specifying the service. for instance Swift, the method to use, i.e type of access, for instance GET and the path to the resource, for example a container.
Rules can be specified in either JSON or YAML format. In this example we are going to use YAML.
Example 1: Read-only access to all objects in a specific container
Start by creating two empty containers. For this to work you need to have the swify operator role.
Go to “Project” > “Containers” and select Container with a plus sign. Name one container-ro and the other container-rw.
Navigate to “Identity” → “Application Credentials” in your project and select “Create Application Credential”.
In the box named “Access Rules” is where you can specify what kind of access and to which resource your application credential should have access to.
Note:
For this to work you will need to specify your project ID after AUTH_
The places of the slashes and asterisks are important.
- service: object-store
  method: GET
  path: /v1/AUTH_<project_id>/container-ro

- service: object-store
  method: GET
  path: /v1/AUTH_<project_id>/container-ro/**

- service: object-store
  method: HEAD
  path: /v1/AUTH_<project_id>/container-ro

- service: object-store
  method: HEAD
  path: /v1/AUTH_<project_id>/container-ro/**
With either openstack-cli or swift-cli, try listing all containers. This should give an Unauthorized failure as the access rules does not allow to list all containers.
$ openstack container list
Unauthorized (HTTP 401) (Request-ID: tx50f94f5e55d049ca8e10b-00694261a3)
When specifying the container directly it should work.
$ openstack container show container-ro
+----------------+---------------------------------------+
| Field          | Value                                 |
+----------------+---------------------------------------+
| account        | AUTH_<project id>                     |
| bytes_used     | 9                                     |
| container      | container-ro                          |
| object_count   | 1                                     |
| storage_policy | hdd3                                  |
+----------------+---------------------------------------+
Accessing objects in that container should also work.
$ openstack object show container-ro testfile
+----------------+---------------------------------------+
| Field          | Value                                 |
+----------------+---------------------------------------+
| account        | AUTH_<project id>                     |
| container      | container-ro                          |
| content-length | 9                                     |
| content-type   | application/octet-stream              |
| etag           | ee321721ddf85e01b4cff48b4fee3c08      |
| last-modified  | Tue, 16 Dec 2025 08:15:55 GMT         |
| object         | testfile                              |
| properties     | Orig-Filename='testfile'              |
+----------------+---------------------------------------+
Trying to upload a file is not permitted since the application credential only has read access to this container.
$ openstack object create container-ro testfile2
Unauthorized (HTTP 401) (Request-ID: tx4065d716470e4e40a2f94-00694268e0)
Example 2: Read-write access to all objects in a specific container
Create an additional application credential and add GET/HEAD/PUT with the path to your second container into the Access Rules box.
Note:
For this to work you will need to specify your project ID after AUTH_
The places of the slashes and asterisks are important.
- service: object-store
  method: GET
  path: /v1/AUTH_<project_id>/container-rw

- service: object-store
  method: GET
  path: /v1/AUTH_<project_id>/container-rw/**

- service: object-store
  method: HEAD
  path: /v1/AUTH_<project_id>/container-rw

- service: object-store
  method: HEAD
  path: /v1/AUTH_<project_id>/container-rw/**

- service: object-store
  method: PUT
  path: /v1/AUTH_<project_id>/container-rw/**
You should not be able to list all containers or the previously created container.
$ openstack container list
Unauthorized (HTTP 401) (Request-ID: tx4b6d3f10baa747148f20d-0069426bef)

$ openstack container show container-ro
Unauthorized (HTTP 401) (Request-ID: tx6e804dda54c5494eae5b5-0069426c0a
Your second container should be accessible.
$ openstack container show container-rw
+----------------+---------------------------------------+
| Field          | Value                                 |
+----------------+---------------------------------------+
| account        | AUTH_8852d8a469ac41ce9a8180ba0fa72595 |
| bytes_used     | 0                                     |
| container      | container-rw                          |
| object_count   | 0                                     |
| storage_policy | hdd3                                  |
+----------------+---------------------------------------+
You can now upload objects since the application credential has write access.
$ echo "some text" > testfile
$ openstack object create container-rw testfile
+----------+--------------+----------------------------------+
| object   | container    | etag                             |
+----------+--------------+----------------------------------+
| testfile | container-rw | ee321721ddf85e01b4cff48b4fee3c08 |
+----------+--------------+----------------------------------+
Show information on your newly created object.
$ openstack object show container-rw testfile
+----------------+---------------------------------------+
| Field          | Value                                 |
+----------------+---------------------------------------+
| account        | AUTH_<project id>                     |
| container      | container-rw                          |
| content-length | 9                                     |
| content-type   | application/octet-stream              |
| etag           | ee321721ddf85e01b4cff48b4fee3c08      |
| last-modified  | Wed, 17 Dec 2025 08:48:54 GMT         |
| object         | testfile                              |
+----------------+---------------------------------------+
Further reading
Openstack documentation on access rules can be found here
6.4 - Barbican
Overview
OpenStack Barbican is a key management service for storing highly sensitive data like private keys for certificates and passwords which needs to be available for applications during runtime.
ELASTX Barbican service is backed by physical HSM appliances to ensure that all data is securely stored.
REST API reference can be found here
OpenStack Barbican client can be found here
Secrets in Barbican have a special design with regards to ID, they are always referenced by a “secret href” instead of a UUID! (This will change in a later release!)
Secret types
There are a few types of secrets that are handled by barbican:
- symmetric - Used for storing byte arrays such as keys suitable for symmetric encryption.
- public - Used for storing the public key of an asymmetric keypair.
- private - Used for storing the private key of an asymmetric keypair.
- passphrase - Used for storing plain text passphrases.
- certificate - Used for storing cryptographic certificates such as X.509 certificates.
- opaque - Used for backwards compatibility with previous versions of the API without typed secrets. New applications are encouraged to specify one of the other secret types.
Store and fetch a passphrase using openstack cli
Make sure you have installed the openstack python client and the barbican python client.
Store a passphrase as a secret:
$ openstack secret store --secret-type passphrase --name "test passphrase" --payload 'aVerYSecreTTexT!'
+---------------+-------------------------------------------------------------------------------+
| Field         | Value                                                                         |
+---------------+-------------------------------------------------------------------------------+
| Secret href   | https://ops.elastx.cloud:9311/v1/secrets/d9e88d84-c668-48d9-a051-f0df2e23485b |
| Name          | test passphrase                                                               |
| Created       | None                                                                          |
| Status        | None                                                                          |
| Content types | None                                                                          |
| Algorithm     | aes                                                                           |
| Bit length    | 256                                                                           |
| Secret type   | passphrase                                                                    |
| Mode          | cbc                                                                           |
| Expiration    | None                                                                          |
+---------------+-------------------------------------------------------------------------------+
Get information (only metadata) about the secret
$ openstack secret get https://ops.elastx.cloud:9311/v1/secrets/d9e88d84-c668-48d9-a051-f0df2e23485b
+---------------+-------------------------------------------------------------------------------+
| Field         | Value                                                                         |
+---------------+-------------------------------------------------------------------------------+
| Secret href   | https://ops.elastx.cloud:9311/v1/secrets/d9e88d84-c668-48d9-a051-f0df2e23485b |
| Name          | test passphrase                                                               |
| Created       | 2018-12-18T12:13:34+00:00                                                     |
| Status        | ACTIVE                                                                        |
| Content types | {u'default': u'text/plain'}                                                   |
| Algorithm     | aes                                                                           |
| Bit length    | 256                                                                           |
| Secret type   | passphrase                                                                    |
| Mode          | cbc                                                                           |
| Expiration    | None                                                                          |
+---------------+-------------------------------------------------------------------------------+
Get the actual secret
$ openstack secret get --payload https://ops.elastx.cloud:9311/v1/secrets/d9e88d84-c668-48d9-a051-f0df2e23485b
+---------+------------------+
| Field   | Value            |
+---------+------------------+
| Payload | aVerYSecreTTexT! |
+---------+------------------+
Store and fetch a passphrase using the REST API (curl examples)
First get a keystone authentication token (using openstack token issue for example).
Store a passphrase as a secret:
Note that payloads is always base64 encoded when uploaded!
$ echo 'AnotHeRs3crEtT3xT!' | base64
QW5vdEhlUnMzY3JFdFQzeFQhCg==

$ curl -H "X-Auth-Token: $TOKEN" \
    -H 'Accept: application/json' \
    -H 'Content-Type: application/json' \
    https://ops.elastx.cloud:9311/v1/secrets -d '{
      "name": "Test Passphrase REST",
      "secret_type": "passphrase",
      "payload": "QW5vdEhlUnMzY3JFdFQzeFQhCg==",
      "payload_content_type": "application/octet-stream",
      "payload_content_encoding": "base64",
      "algorithm": "AES",
      "bit_length": 256,
      "mode": "CBC"
  }' | python -m json.tool
{
    "secret_ref": "https://ops.elastx.cloud:9311/v1/secrets/85b2df94-a44b-452b-807b-ddcee83d824b"
}
Get the secret payload
$ curl -H "X-Auth-Token: $TOKEN" \
    -H 'Accept: application/octet-stream' \
    https://ops.elastx.cloud:9311/v1/secrets/85b2df94-a44b-452b-807b-ddcee83d824b/payload
AnotHeRs3crEtT3xT!
6.5 - Billing
Overview
We use OpenStack CloudKitty for billing purposes and with it’s open API it is possible to get detailed information about the cost of resources.
NOTE: The billing data engine is ALWAYS 4 hours behind so it is only possible to retrieve rating data up until 4 hours ago! This is to ensure that all billing data is in place before calculating costs.
Prerequisites
To fetch data from cloudkitty using the OpenStack CLI it is neccessary to install the openstack python client and the openstack cloudkitty python client.
pip install python-openstackclient python-cloudkittyclient
As of this writing, version 5.2.2 of the openstack client and 4.8.0 of the cloudkitty client is working well.
Known limitations
As cloudkitty stores data for a long time, retrieval of data where the begin timestamp is omitted, or more than 1 month ago, will take a very long time or even timeout. Even fetching a month worth of data will take at least 10 minutes so do have patience when exploring your data with this API.
Fetch summary for last month
To fetch the total summary for the last month:
$ openstack rating summary get -b $(date --date='1 month ago' -Isecond)
+----------------------------------+---------------+-------------+---------------------+---------------------+
| Tenant ID                        | Resource Type | Rate        | Begin Time          | End Time            |
+----------------------------------+---------------+-------------+---------------------+---------------------+
| 17cb6c5e5af8481e8960d8c4f4131b0f | ALL           | 47511.96316 | 2024-07-28T18:57:28 | 2024-09-01T00:00:00 |
+----------------------------------+---------------+-------------+---------------------+---------------------+
Fetch dataframes for specific resource types
It is also possible to fetch data for specific resources or resource types. This is specifically useful for getting costs for a specific resouce like an instance or volume.
Group by resource type (-g flag):
$ openstack rating summary get -b $(date --date='1 day ago' -Isecond) -g res_type
+----------------------------------+--------------------------+-----------+---------------------+---------------------+
| Tenant ID                        | Resource Type            | Rate      | Begin Time          | End Time            |
+----------------------------------+--------------------------+-----------+---------------------+---------------------+
| 17cb6c5e5af8481e8960d8c4f4131b0f | network-traffic-sent     | 0         | 2024-08-27T19:59:04 | 2024-09-01T00:00:00 |
| 17cb6c5e5af8481e8960d8c4f4131b0f | network-traffic-received | 0         | 2024-08-27T19:59:04 | 2024-09-01T00:00:00 |
| 17cb6c5e5af8481e8960d8c4f4131b0f | image.size               | 0.16569   | 2024-08-27T19:59:04 | 2024-09-01T00:00:00 |
| 17cb6c5e5af8481e8960d8c4f4131b0f | snapshot.size            | 0.22      | 2024-08-27T19:59:04 | 2024-09-01T00:00:00 |
| 17cb6c5e5af8481e8960d8c4f4131b0f | storage.objects.size     | 1.43383   | 2024-08-27T19:59:04 | 2024-09-01T00:00:00 |
| 17cb6c5e5af8481e8960d8c4f4131b0f | router                   | 14.96     | 2024-08-27T19:59:04 | 2024-09-01T00:00:00 |
| 17cb6c5e5af8481e8960d8c4f4131b0f | ip.floating              | 21.12     | 2024-08-27T19:59:04 | 2024-09-01T00:00:00 |
| 17cb6c5e5af8481e8960d8c4f4131b0f | volume.size              | 686.90159 | 2024-08-27T19:59:04 | 2024-09-01T00:00:00 |
| 17cb6c5e5af8481e8960d8c4f4131b0f | instance                 | 688.09399 | 2024-08-27T19:59:04 | 2024-09-01T00:00:00 |
+----------------------------------+--------------------------+-----------+---------------------+---------------------+
Filter on resource type (-s flag):
$ openstack rating summary get -b $(date --date='1 day ago' -Isecond) -s instance
+----------------------------------+---------------+-----------+---------------------+---------------------+
| Tenant ID                        | Resource Type | Rate      | Begin Time          | End Time            |
+----------------------------------+---------------+-----------+---------------------+---------------------+
| 17cb6c5e5af8481e8960d8c4f4131b0f | instance      | 688.09399 | 2024-08-28T05:59:49 | 2024-09-01T00:00:00 |
+----------------------------------+---------------+-----------+---------------------+---------------------+
Fetch raw dataframes
Cloudkitty is built on a concept called dataframes which is the actual data rated. Each dataframe contains the rated value for each resource for an hour interval and can be exported as a CSV which can then be used to summarize the totals per resource.
Example config for generating a CSV that contains all relevant information
$ cat tmp/cloudkitty.csv
# This exact file format must be respected (- column_name: json_path)
# The path is interpreted using jsonpath-rw-ext, see
# https://github.com/sileht/python-jsonpath-rw-ext for syntax reference
- 'Begin': '$.begin'
- 'End': '$.end'
- 'Resource Type': '$.service'
- 'Resource ID': '$.desc.id'
- 'Qty': '$.volume'
- 'Cost': '$.rating'
Get raw dataframes for all instances in the project as a CSV for the last 5 hours.
$ openstack rating dataframes get -b $(date --date='5 hours ago' -Isecond) -r instance -f df-to-csv --format-config-file tmp/cloudkitty.csv
Begin,End,Resource Type,Resource ID,Qty,Cost
2024-09-10T09:00:00,2024-09-10T10:00:00,instance,064e8601-8c83-477c-85c4-f40884ad71b9,1,3.36
2024-09-10T09:00:00,2024-09-10T10:00:00,instance,21bcc6e2-416a-48c8-8684-2cfaa806e0e3,1,0.14
2024-09-10T10:00:00,2024-09-10T11:00:00,instance,064e8601-8c83-477c-85c4-f40884ad71b9,1,3.36
2024-09-10T10:00:00,2024-09-10T11:00:00,instance,21bcc6e2-416a-48c8-8684-2cfaa806e0e3,1,0.14
2024-09-10T11:00:00,2024-09-10T12:00:00,instance,064e8601-8c83-477c-85c4-f40884ad71b9,1,3.36
2024-09-10T11:00:00,2024-09-10T12:00:00,instance,21bcc6e2-416a-48c8-8684-2cfaa806e0e3,1,0.14
From this CSV output it is fairly easy to sum up the Cost per instance id to get the detailed cost per instance for an interval
6.6 - Detach & Attach interface on a Ubuntu instance
Overview
If you need to change interface on a Ubuntu instance, then this is the procedure to use.
-
Run the following command in the instance.
sudo cloud-init clean -
Shut down the instance
-
Detach / Attach the network interface
-
Start the instance
-
Reassociate Floating IP with the instance
6.7 - EC2 Credentials
Overview
For using the OpenStack S3 API:s you need to generate an additional set of credentials. These can then be used to store data in the Swift Object store for applications that don’t have native Swift support but do support the S3 interfaces.
NOTE: If the application does support Swift natively, using Swift will provide superior performance and generally a better experience.
Create and fetch credentials using openstack cli
Make sure you have installed the openstack python client.
Generate credentials:
$ openstack ec2 credentials create
+-----------------+-----------------------------------------------------------------------------------------------------------------------------------------+
| Field           | Value                                                                                                                                   |
+-----------------+-----------------------------------------------------------------------------------------------------------------------------------------+
| access          | xxxyyyzzz                                                                                                                               |
| access_token_id | None                                                                                                                                    |
| app_cred_id     | None                                                                                                                                    |
| links           | {'self': 'https://ops.elastx.cloud:5000/v3/users/123/credentials/OS-EC2/456'}                                                           |
| project_id      | 123abc                                                                                                                                  |
| secret          | aaabbbccc123                                                                                                                            |
| trust_id        | None                                                                                                                                    |
| user_id         | efg567                                                                                                                                  |
+-----------------+-----------------------------------------------------------------------------------------------------------------------------------------+
Fetch credentials:
$ openstack ec2 credentials list
+----------------------------------+----------------------------------+----------------------------------+----------------------------------+
| Access                           | Secret                           | Project ID                       | User ID                          |
+----------------------------------+----------------------------------+----------------------------------+----------------------------------+
| xxxyyyzzz                        | aaabbbccc123                     | 123abc                           | efg567                           |
+----------------------------------+----------------------------------+----------------------------------+----------------------------------+
Delete credentials
Use the access key to refer to the credentials you wish to delete:
$ openstack ec2 credentials delete xxxyyyzzz
6.8 - Octavia
This is an example of a minimal setup that includes a basic HTTP loadbalancer. Here is a short explanation of a minimal (configuration) setup from GUI (Horizon).
-
Network -> Loadbalancer -> Create loadbalancer
-
Load Balancer Details: Subnet: Where your webservers live
-
Listener Details: Select HTTP, port 80.
-
Pool Details: This is your “pool of webservers”. Select Algoritm of preference.
-
Pool members: Select your webservers.
-
Finally, proceed to “Create Loadbalancer”.
Note, the loadbalancer will not show up in the Network Topology graph. This is expected.
Octivia features numerous configuration variations. The full reference of variations and CLI guide can be found here.
OpenStack Octavia client can be found here
6.9 - Swift Guides
6.9.1 - Swift getting started
Overview
Swift is Elastx object storage in OpenStack. Swift provides high availability by utilizing all availability zones and is encrypted at rest. This guide will help you get started with the basics surrounding Swift object storage.
Swift/S3 Compatibility
Swift has an s3 compatible API for applications that don’t natively support the Swift API.
Getting started with Swift CLI
Prerequisites
- python-swiftclient installed.
- Application credential. See here on how to get started with application crendentials.
Swift-cli
Start by sourcing your application credential.
Creating containers and uploading objects
Start by creating a new container:
$ swift post my_container
Upload a file to your container:
$ swift upload my_container ./file1.txt
List containers and objects
To list all containers in your project:
$ swift list
my_container
my_container2
List all objects from a specific container:
$ swift list my_container
file1.txt
Show statistics of your containers and objects
With the stat option, you can get statistics ranging from specific objects to your entire account. To list statistics of a container:
$ swift stat my_container
Account: AUTH_7bf53f20d4a2523a8045c42ae505acx
             Container: my_container
               Objects: 1
                 Bytes: 7
              Read ACL:
             Write ACL:
               Sync To:
              Sync Key:
          Content-Type: application/json; charset=utf-8
           X-Timestamp: 1675242117.33639
         Last-Modified: Wed, 01 Feb 2023 09:15:39 GMT
         Accept-Ranges: bytes
      X-Storage-Policy: hdd3
            X-Trans-Id: tx2f1e73d3b29a4aba99c1b-0063da2e2b
X-Openstack-Request-Id: tx2f1e73d3b29a4aba99c1b-0063da2e2b
            Connection: close
Download objects
You can download single objects or all objects from a specific container or account.
Download a specific object:
$ swift download my_container file1.txt -o ./file1.txt
Download all objects from a specific container:
$ swift download my_container -D </path/to/directory/>
Download all objects from your account:
Beware: If you have a large amounts of objects, this can take some time.
$ swift download --all -D </path/to/directory/>
Delete containers and objects
WARNING: The delete option will execute immediately without any confirmation. This action is irreversible.
Delete specific object from a specified container.
$ swift delete my_container file1.txt
Delete a container with all of its objects.
$ swift delete my_container
Getting started with Swift in Horizon
With Openstacks Horizon you can get a good overview over your object storage. There are limitations in Swifts functionality when using Horizon, to fully take advantage of Swifts functions we recommend you to use the swift cli.
This guide will show you the basics with using Swift object storage in Horizon.
Create your first container
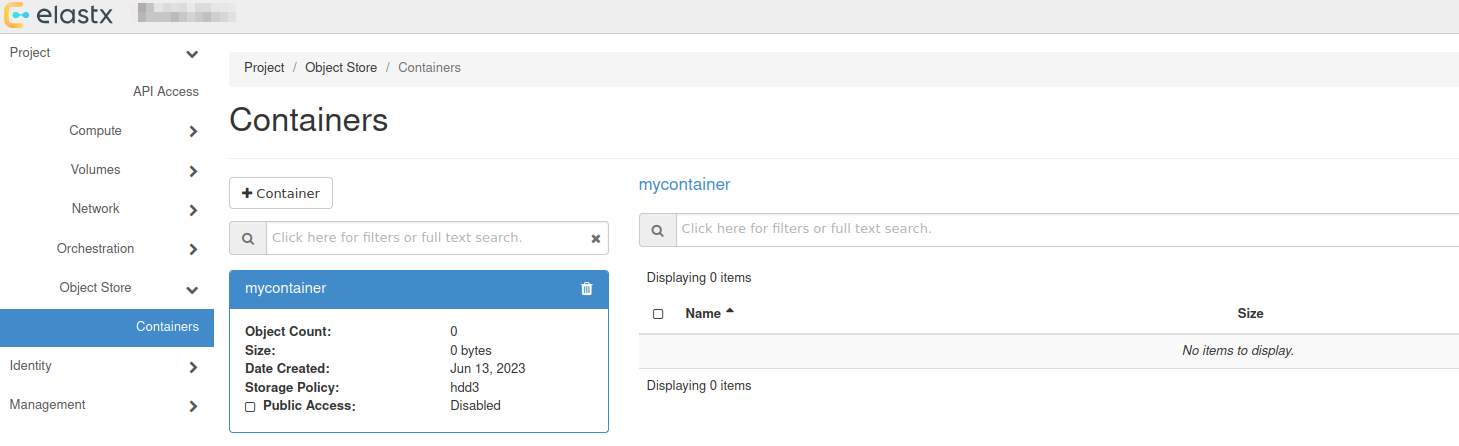
Navigate to “Project” → “Object Store” → “Containers”
Here you will see all the containers in your object storage.
Choose +Container to create a new container:

Choose a name for your new container:

You will se that a new container has been added, which date it was created and that it is empty.
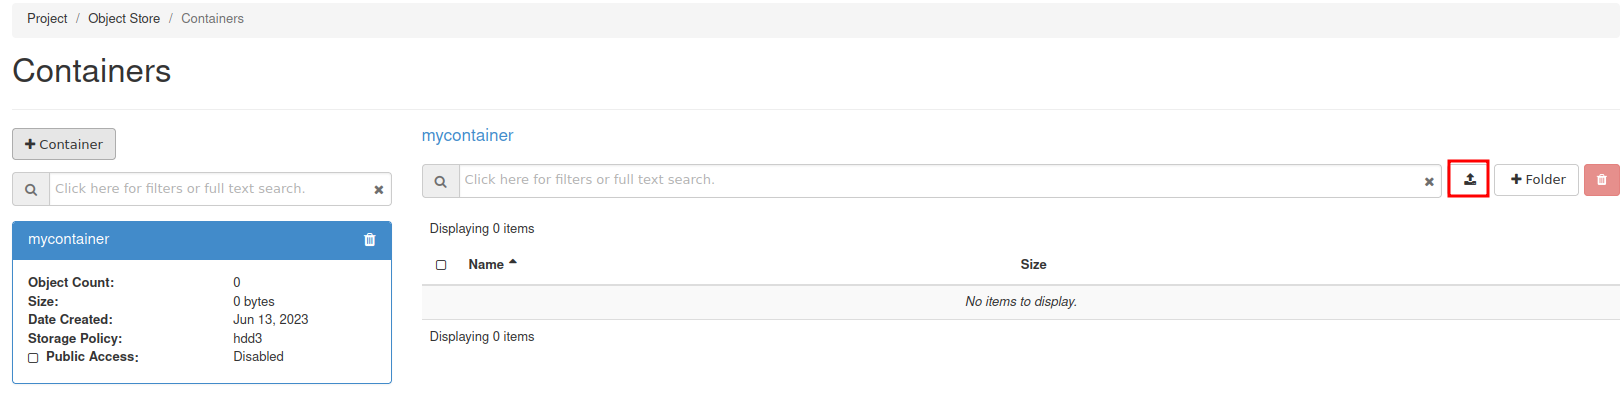
Upload your first file
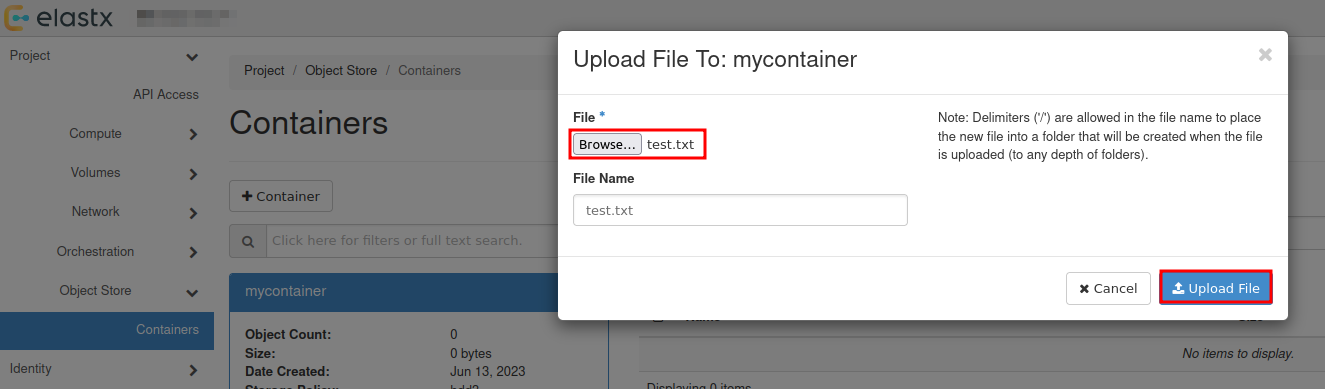
To upload your first file, press the up arrow next to +Folder:
Select the the file you want to upload:
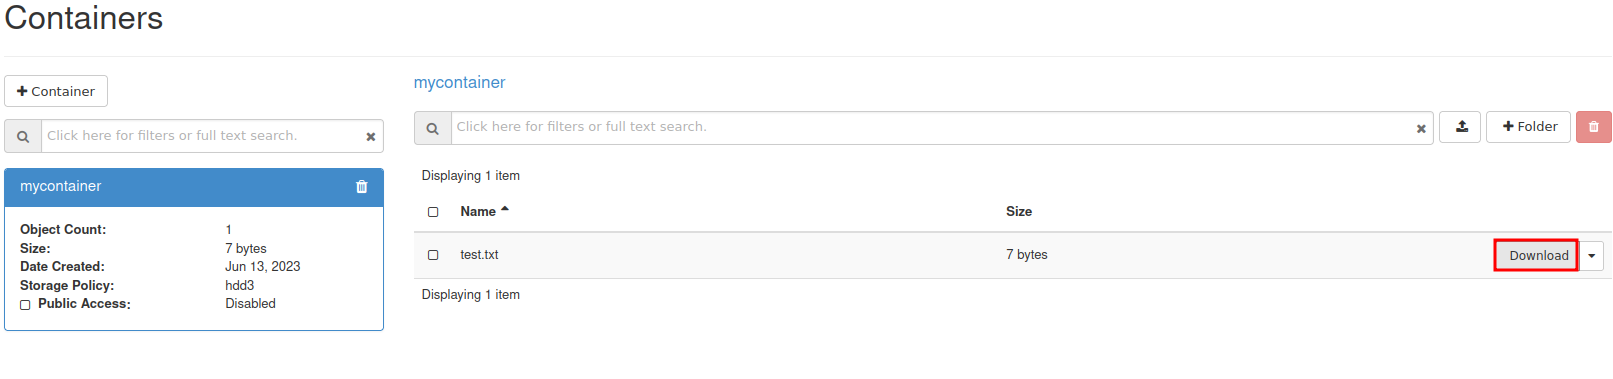
Download file
To download a file, select your container and press Download next to the object.
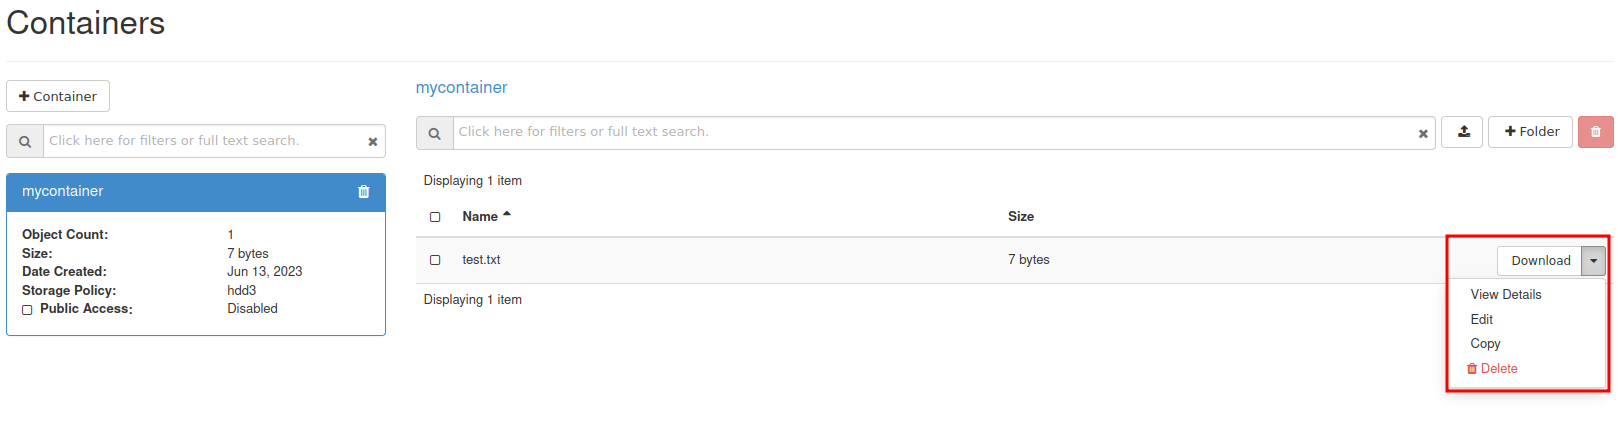
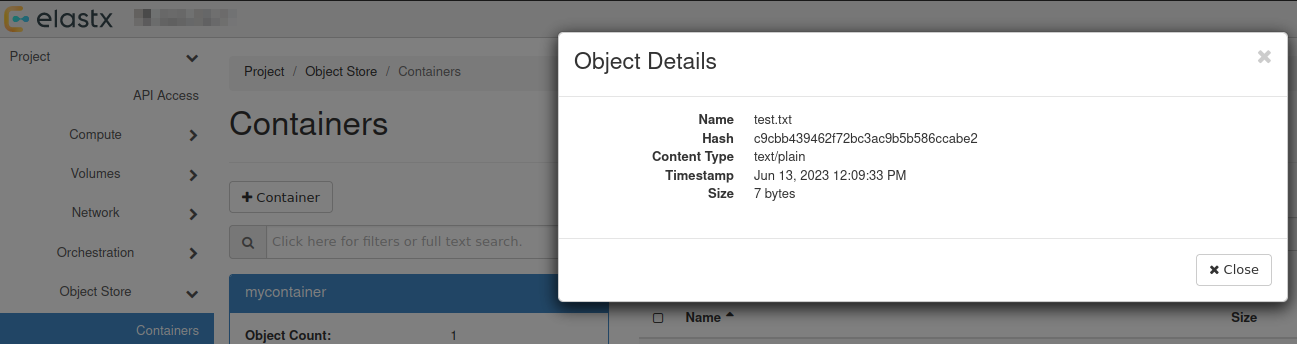
View details of an object
You can view details of an object such as Name, Hash, Content Type, Timestamp and Size.
Select the down arrow next to Download for the object you want to inspect and choose View Details:
Further reading
- For more advanced features, see the official OpenStack documenation
- Rclone has native support for Swift. You can read more about Rclone’s support for Swift here.
6.9.2 - Swift projects
Overview
There are two main options for access separation in Swift:
- You can use Access rules to manage access to specific containers using application credentials. This alone will not stop the ability for users to create/remove virtual machines. See more information here on how to get started with access rules.
- Dedicated Swift project. Dedicated Swift projects are basically OpenStack projects with reduced access to any resource except swift. This is sometime needed due to the current limitation of how privilege/role management works for users in OpenStack.
Swift Project
In this guide we will go through how to manage user permissions for Swift containers using ACLs in a Swift project.
The purpose of so called “Swift projects” ("
The Swift project can be used in two ways - to store/manage Swift containers and/or manage Swift-only users.
How to manage permissions via ACLs
If you want a user to be able to create, manage and upload/download objects for any Swift containers created in the Swift project, inviting and assigning the user the role “Object Store” (known as “swiftoperator” in the API/CLI) in “Management” -> “Access Control” -> “Project Users” should be sufficient.
If you instead want a user to be able to read and/or write to a specific Swift containter created in the Swift project or any another project you have, you will need to invite the user to the Swift project, assign them the role “Project Member” and configure Swift container ACLs for the target container(s). We’ll go through an example below.
In order to configure Swift ACLs you will need:
- A user with the “Object Store” (“swiftoperator”) role in the project that contains the container you want to restrict/provide access to
- The Swift CLI or another API client capable of configuring ACLs (this is currently not supported through Horizon)
- An OpenStack RC file (openrc), “clouds.yml” or environment variables set for authenticating towards the API as the user used to configure ACLs
- Name of the container you want to configure ACLs for
- ID of the project in which the container is stored and the ID for the Swift project if they are not the same (listed under “Identity” -> “Projects” in Horizon or
openstack project listvia the CLI) - ID of the user you want to restrict/provide access for (accessible through “Identity” -> “Users” in Horizon as that user)
In the following example we’ll use the Swift CLI to configure read/write/list access to a specific container created in the Swift project
# Using variables here to make it easier to follow/adapt to new service users and Swift containers
$ SWIFT_PROJECT_ID="b71cd232c8544cf28a7d7aad797cafe9"
$ SWIFT_CONTAINER_NAME="test-container-1"
$ TARGET_USER_ID="whatever_id_it_has"

# Explicitly specifying project ID here, in-case you use an OpenRC/clouds.yml file downloaded from your other projects
$ OS_PROJECT_ID="${SWIFT_PROJECT_ID}" swift post "${SWIFT_CONTAINER_NAME}" --read-acl ".rlistings,${SWIFT_PROJECT_ID}:${TARGET_USER_ID}" --write-acl "${SWIFT_PROJECT_ID}:${TARGET_USER_ID}"
If you want to provide/restrict access to a container that has been created in another project, the process is similar:
# Specifying the ID for the other project instead
$ OS_PROJECT_ID="<project-id>" swift post "${SWIFT_CONTAINER_NAME}" --read-acl ".rlistings,${SWIFT_PROJECT_ID}:${TARGET_USER_ID}" --write-acl "${SWIFT_PROJECT_ID}:${TARGET_USER_ID}"
Note: Replace <project-id> with the actual Project ID
If you need any clarification, further guidance or have other questions, feel free to reach out to our support.
Known limitations
Currently, cross-project ACLs don’t work if you want to use the S3 compatibility.
Further reading
6.9.3 - Swift S3 compatibility
Overview
Swift provides an S3 compatible API for applications that don’t support the Swift API. Note that you need to create EC2 credentials for this to work.
NOTE: The S3 region must be set to “us-east-1” for compatibility with “AWS Signature Version 4”
NOTE: If the application does support Swift natively, using Swift will provide superior performance and generally a better experience.
Example s3cmd configuration
The configuration below works with s3cmd:
[default]
access_key = 00000000000000000000000000000
secret_key = 00000000000000000000000000000
host_base = swift.elastx.cloud
host_bucket = swift.elastx.cloud
use_https = True
bucket_location = us-east-1
Known Issues
The Swift S3 API has a known bug with sigv4-streaming and chunked uploads. We are aware of an upstream fix that has been merged - but we do not yet have it implemented on our platform.
6.10 - Terraform Backend
Overview
Swift is accessable with the s3 backend. To get the access and secret key follow this guide. EC2 credentials
Example configuration
This is what you need to get the s3 backend to work with swift.
backend "s3" {
  bucket = "<The bucket you want to use>"
  key    = "<Path and name to tf state file>"
  endpoint   = "https://swift.elastx.cloud"
  sts_endpoint = "https://swift.elastx.cloud"
  access_key = "<Puth your access key here>"
  secret_key = "<Put your secret key here>"
  region = "us-east-1"
  force_path_style = "true"
  skip_credentials_validation = "true"
}
key variable example: “path/to/tf-state-file”.
This is the path in the bucket.
6.11 - User Management
Overview
User management is no longer available in Horizon, OpenStacks UI. To add or manage users in your project, you can now use the Elastx cloud console instead. See here for more information on how to get started.
User management
There are a couple of roles that can be assigned to users inside of a project:
| Role | Description |
|---|---|
| load-balancer_member | Allow access to manage load balancers (Octavia). |
| swiftoperator | Allow access to manage objects in object store (Swift). |
| heat_stack_owner | Allow access to manage orchestration templates (Heat). |
| _member_ | Allow access to core services such as compute (Nova), network (Neutron) and volume (Cinder). |
| creator | Allow access to manage objects inside of secret store (Barbican). |
6.12 - Volume Guides
6.12.1 - Volume Attachment Limits
Overview
If you need to attach more than the default limitation of volume attachments, then this is possible by using a custom image and changing the properties of the image to use a non-default scsi driver.
Please note that any servers created before the image properties are set need to be re-created in order to use the updated driver.
The following properties need to be set in order to achieve this.
hw_disk_bus=scsi
hw_scsi_model=virtio-scsi
Volume attachment limits
| Driver | Max volumes per server |
|---|---|
| Default | 26 |
| virtio-scsi | 128 |
Openstack CLI examples
Creating a new image (note that additional options are also needed when creating images, please refer to the Openstack documentation for more information)
openstack image create --property hw_disk_bus=scsi --property hw_scsi_model=virtio-scsi ${IMAGE_ID}
Updating an existing private image
openstack image set --property hw_disk_bus=scsi --property hw_scsi_model=virtio-scsi ${IMAGE_ID}
6.12.2 - Volume Backup & Restore
Overview
Volume backups in Elastx OpenStack uses Swift as the storage backend. This means that your backups will automatically be placed in all availability zones. This guide will help you get started with how to create volume backups and how to restore them using OpenStack’s Horizon and CLI.
Backup and restrore from Horizon
Backup from Horizon
- Navigate to “Project” → “Volumes” pick the volume you want to backup and choose
Create Backup
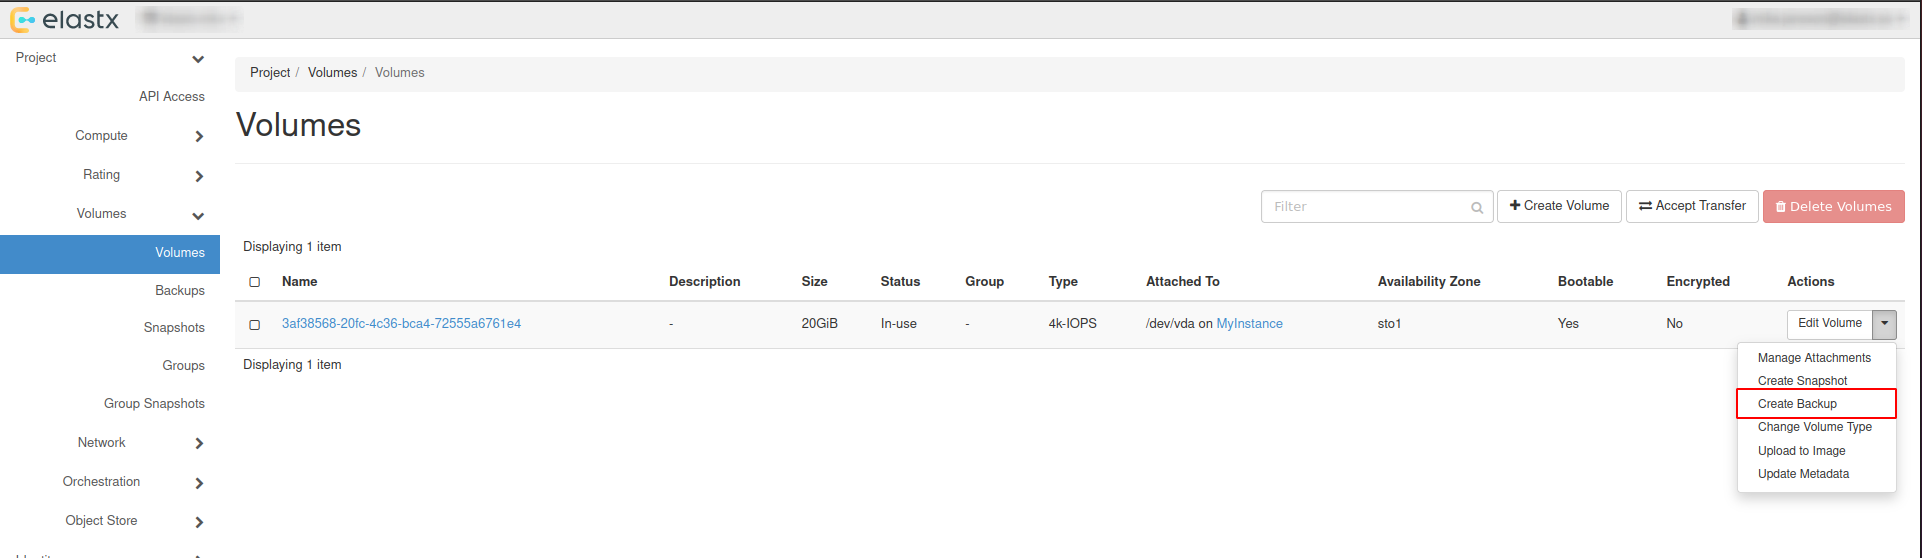
- In the pop-up window, add a name and a description of your liking and press
Create Volume Backup.
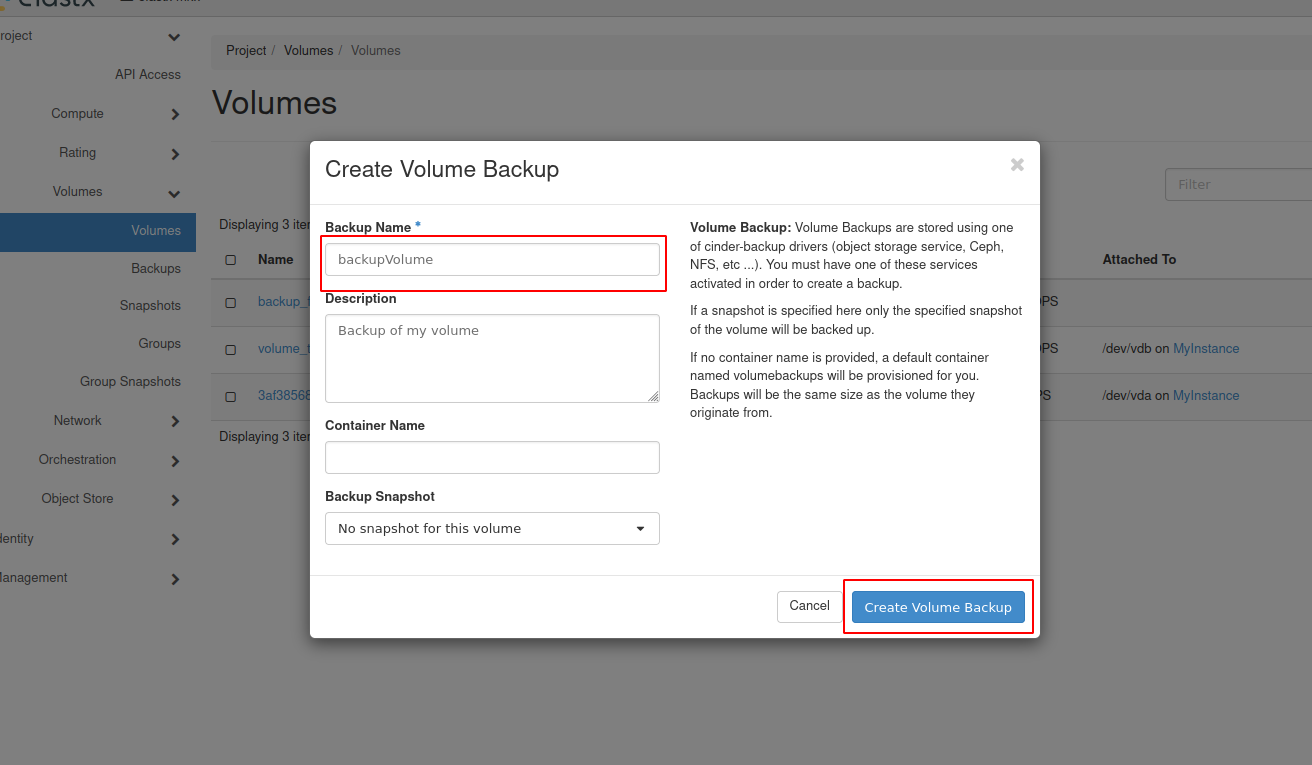
- Navigate to “Project” → “Volumes” → “Backups” to see the backup status.
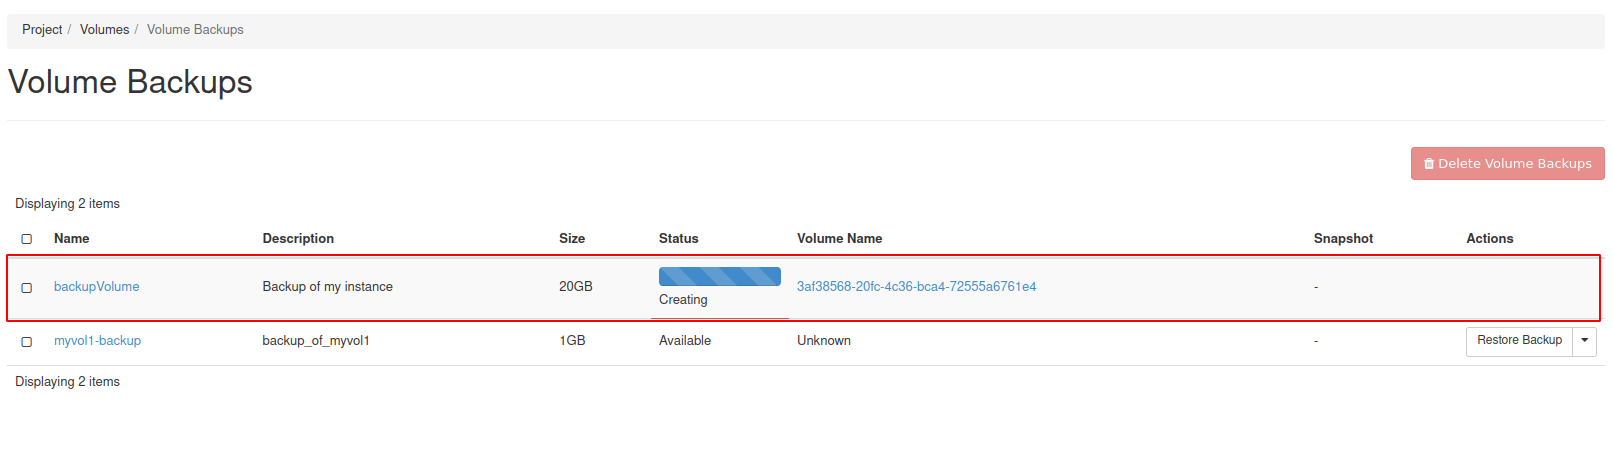
Restore from horizon
Restoring from backups can be done in two ways, one way is to create a new volume manually from the “Project” → “Volumes”, or to have the volume automatically created when restoring from the “Project” → “Volumes” → “Backups”.
Beware: If option two is chosen, the Availability Zone and Size gets chosen automatically. This means that the volume might end up in a different Availability Zone than intended.
Option #1 - Create volume and restore from backup
- Navigate to “Project” → “Volumes” and press
Create Volume.
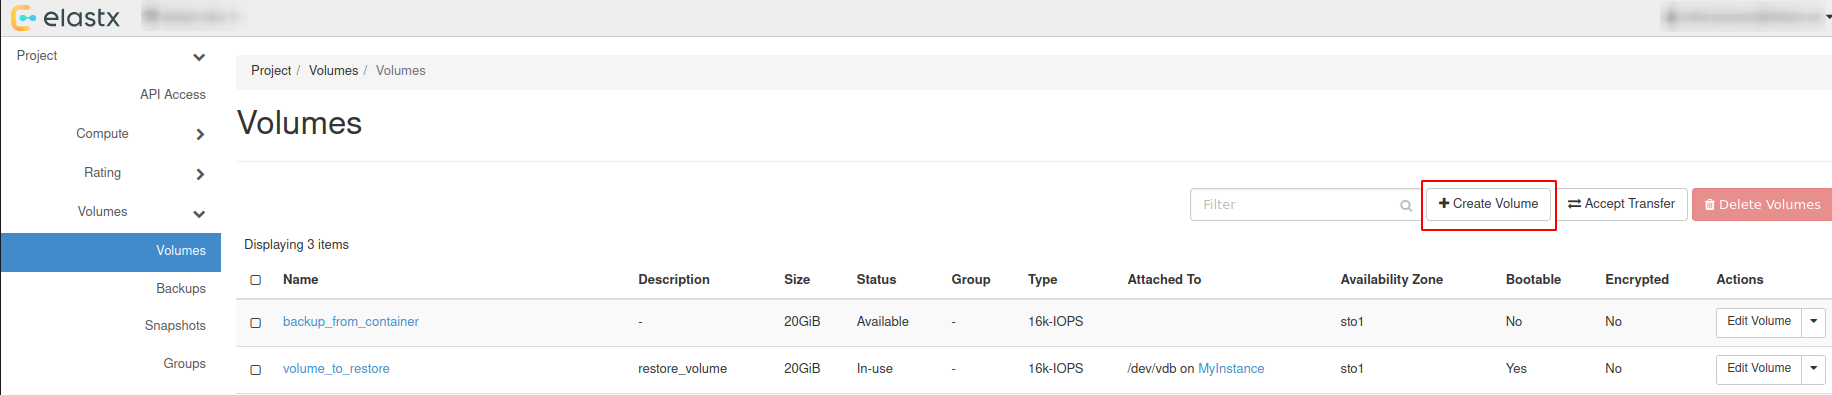
- Choose a name, description and size of your liking for the new volume.
Beware: Volume Size has to be at minimum the size of the backup. The Volume also has to be in the same Availability Zone as the instance it will be attached too.
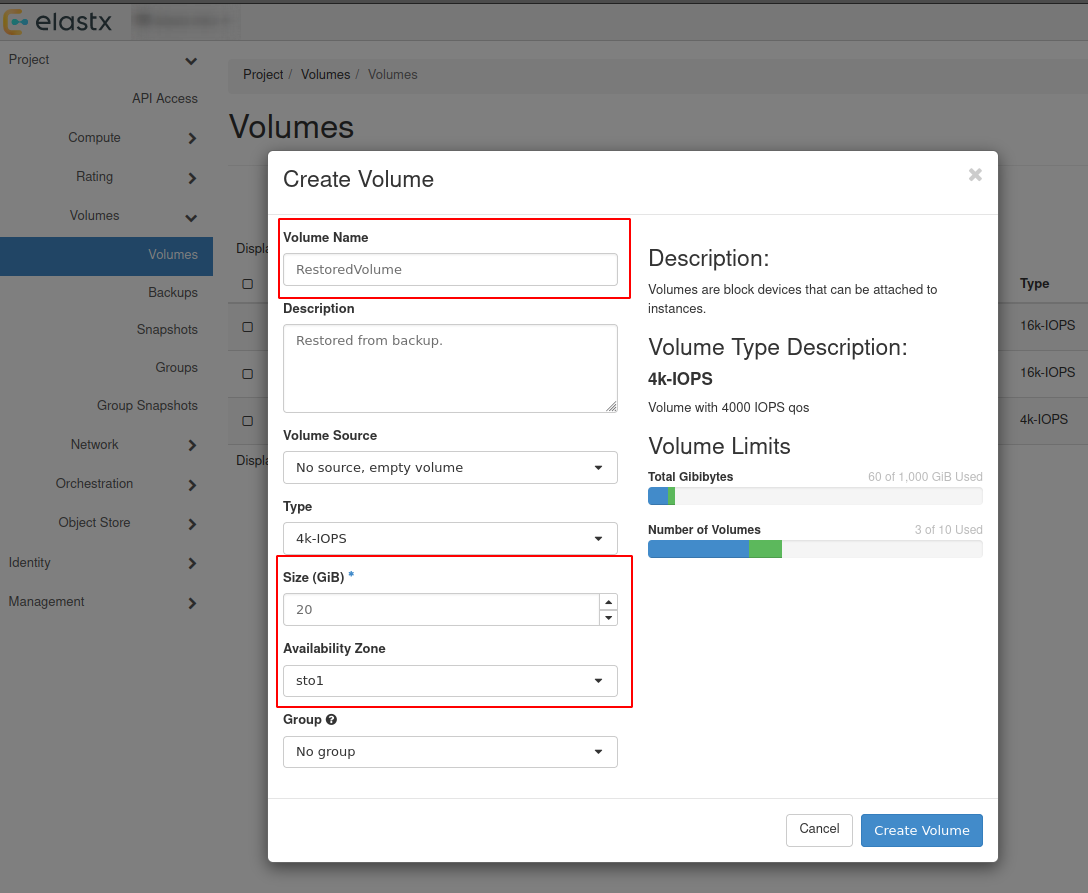
- Navigate to “Project” → “Volumes” → “Backups” and press
Restore Backup.
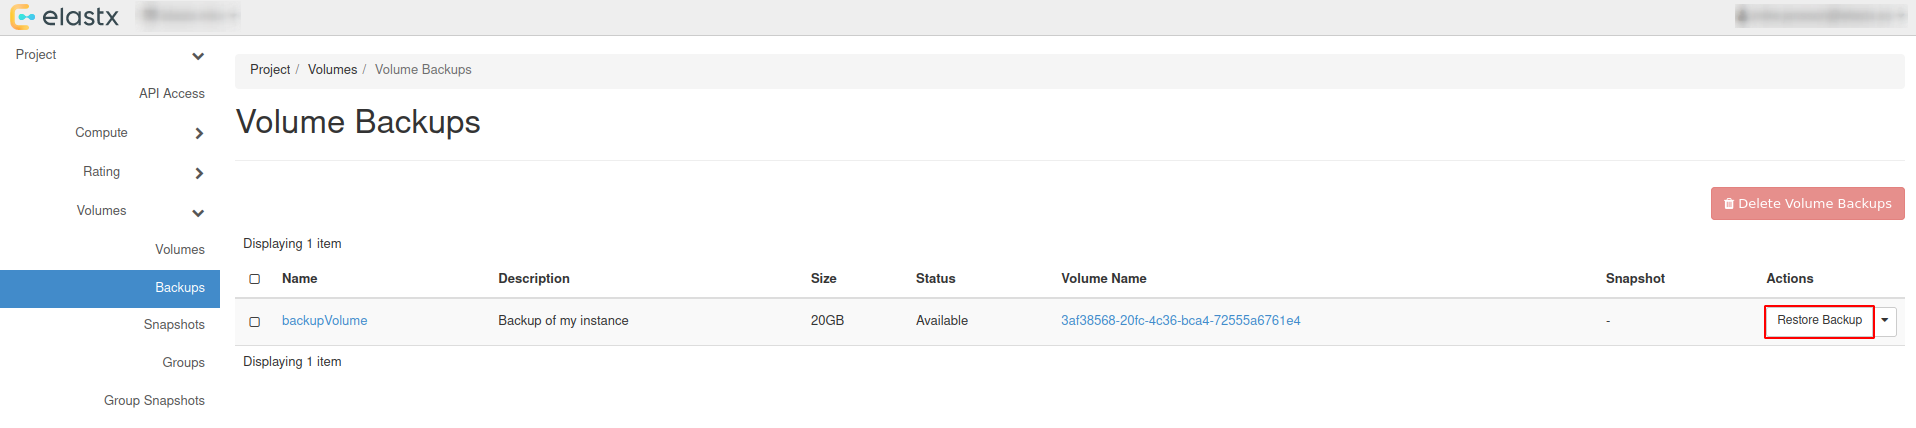
- Select your newly created volume and press
Restore Backup to Volume.
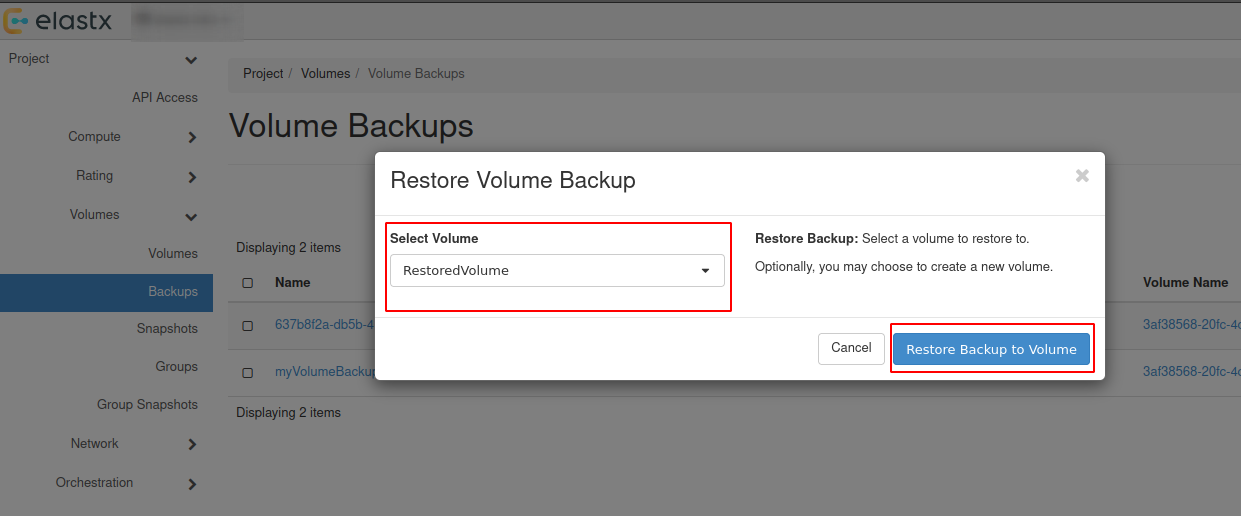
Option #2 - Restore backup without selecting a volume
Beware: See the note about availability zones and sizes above.
- Navigate to “Project” → “Volumes” → “Backups” and press
Restore Backup.
- Select
Create a New Volumeand pressRestore Backup to Volume.
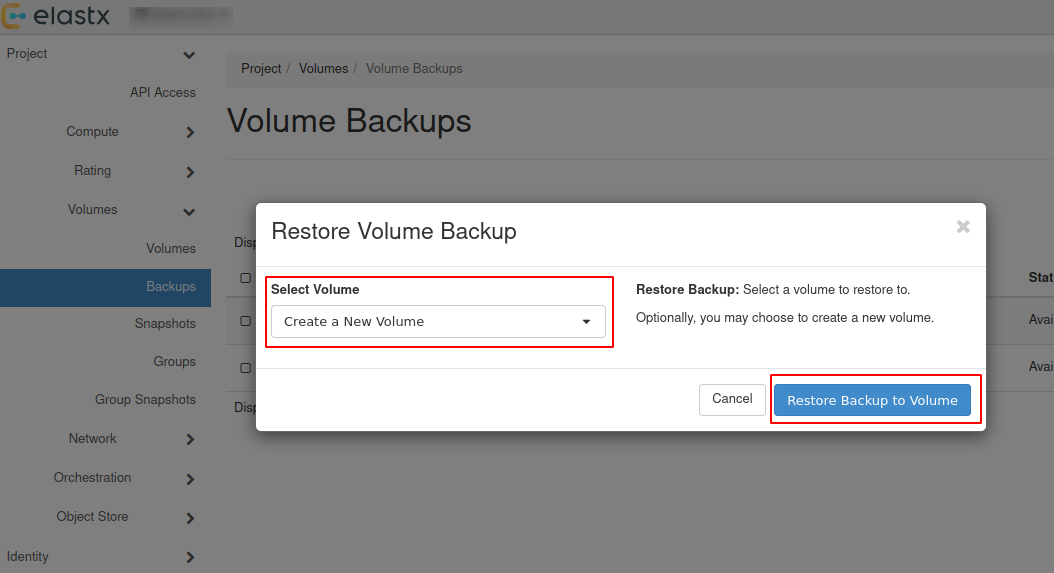
- The restored backup will be available in “Project” → “Volumes”.
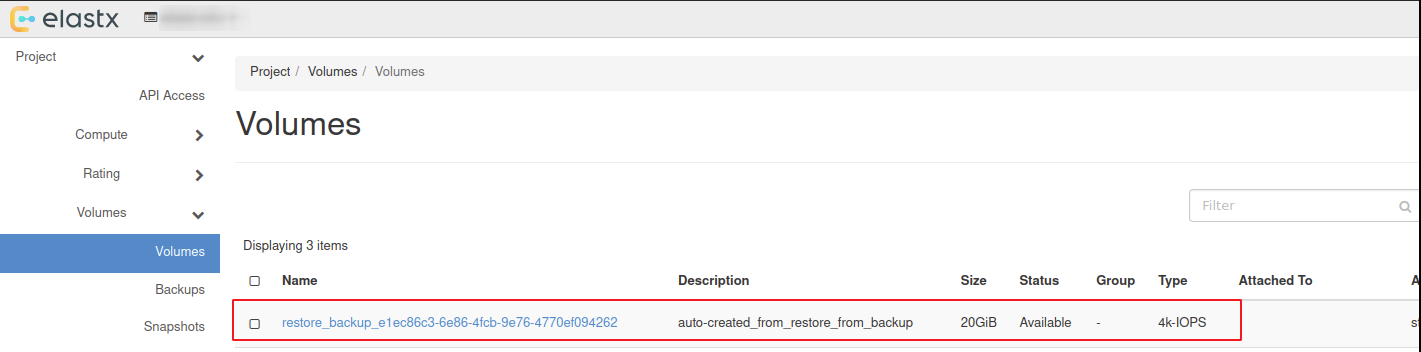
Attach & Detach volumes from horizon
- Navigate to “Project” → “Volumes” and press the ⬇ arrow next to
Edit Volumeon the volume you want to attach and then pressManage Attachments
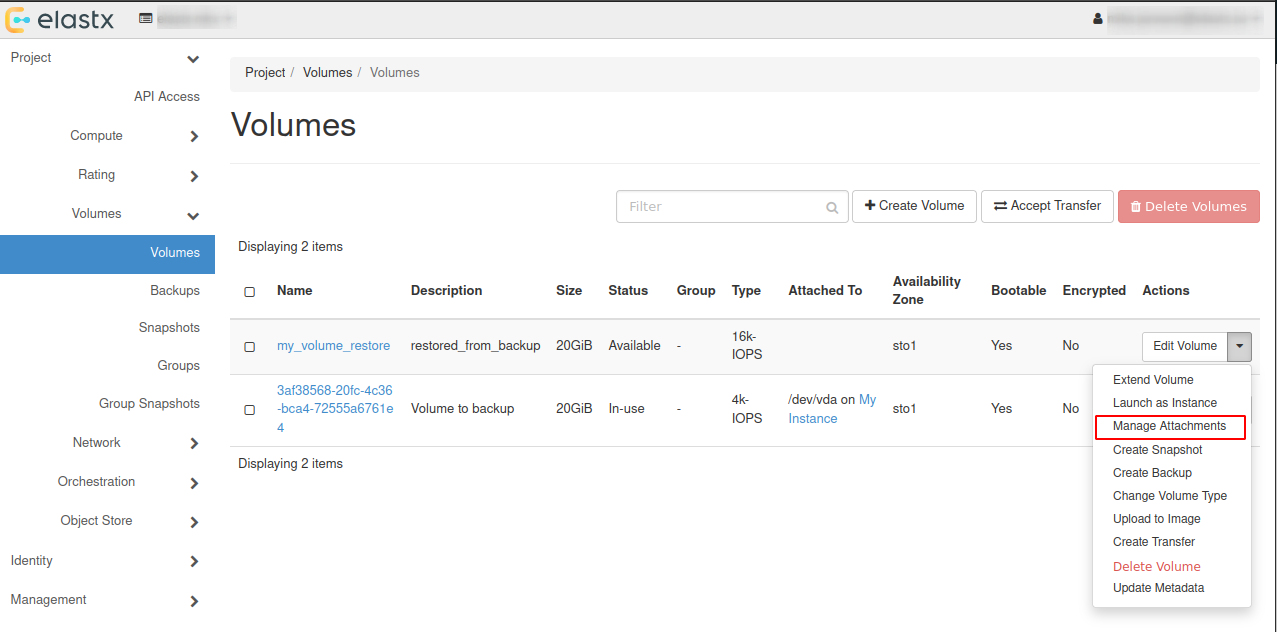
- In the pop-up window choose an instance you want to attach the restored volume to.
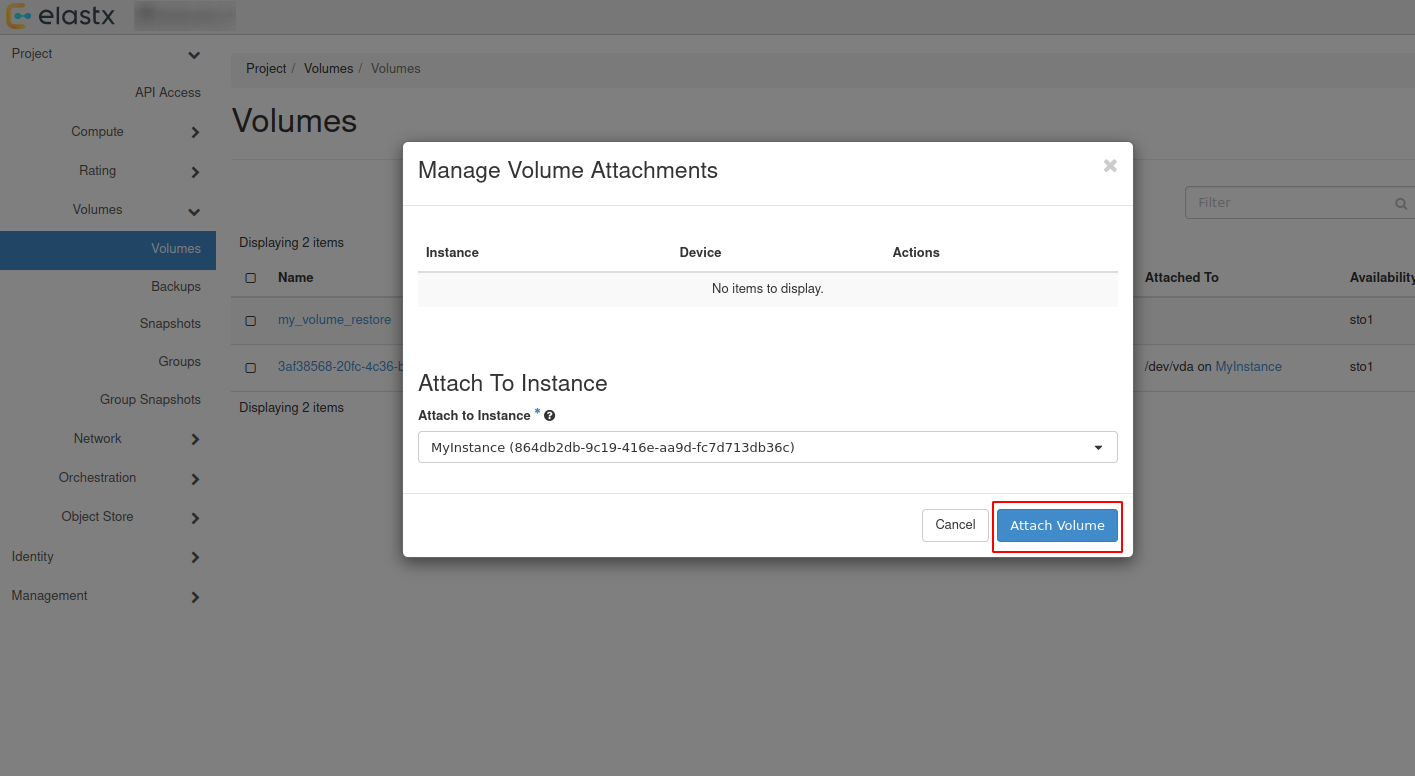
- Check volumes again in “Project” → “Volumes” to see if the volume is attached to the instance.
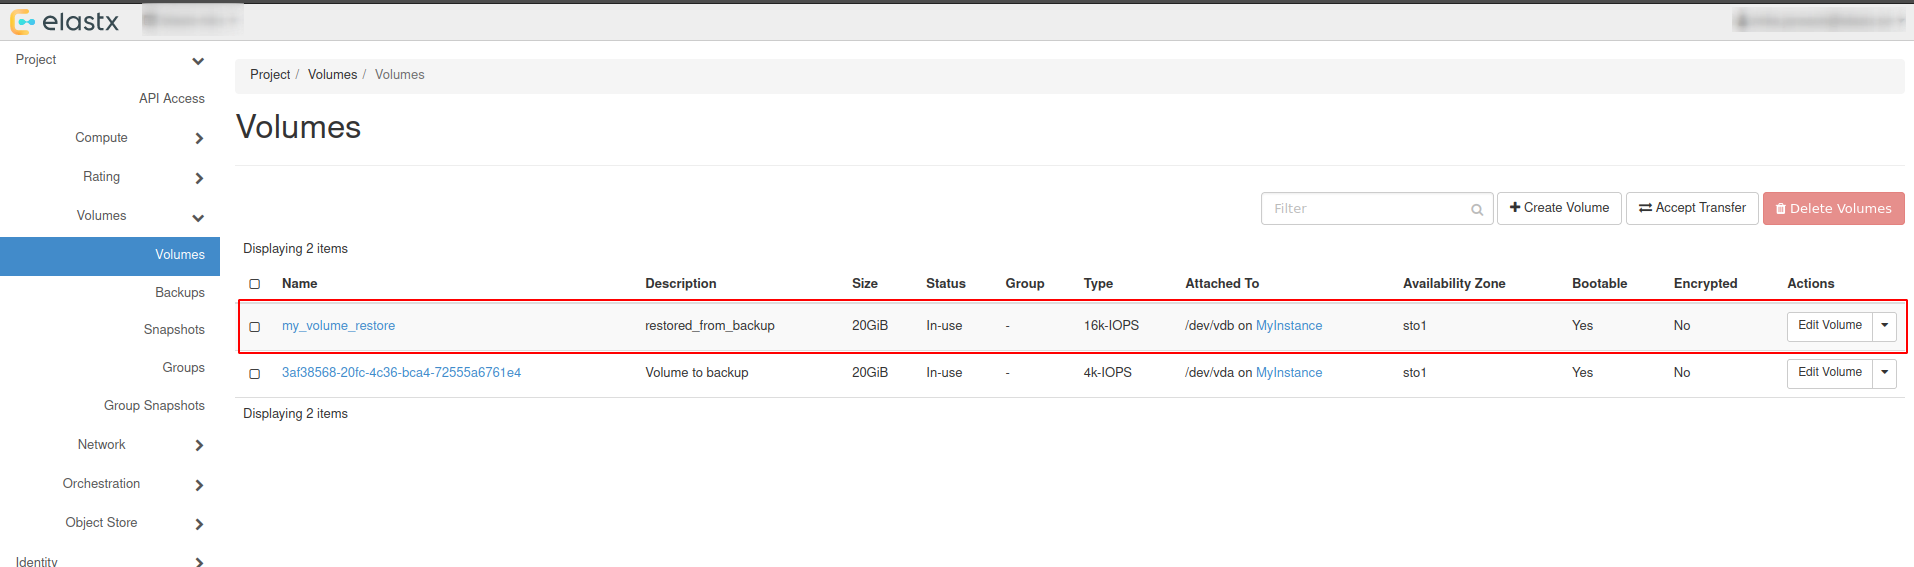
- To detach the volume, Navigate to “Project” → “Volumes” and press the ⬇ arrow next to
Edit Volumeon the volume you want to detach and then pressManage Attachments. In the pop-up window choose the instance you want to detach the volume from.
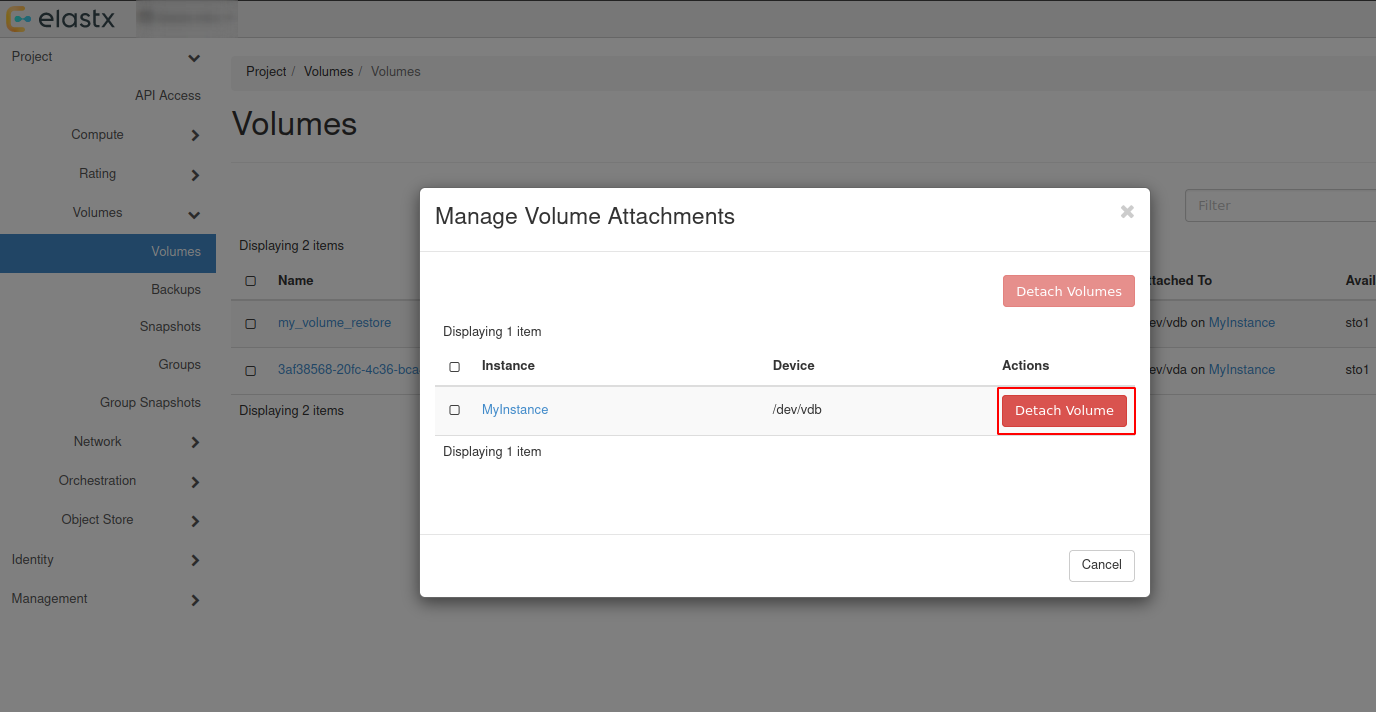
Backup and restore using openstack-cli
Backup using cli
- List all volumes:
$ openstack volume list

+--------------------------------------+----------+--------+------+-------------------------------------+
| ID                                   | Name     | Status | Size | Attached to                         |
+--------------------------------------+----------+--------+------+-------------------------------------+
| ce29137e-d7d7-45a6-ae63-bb6605af5335 | myvolume | in-use |  100 | Attached to myinstance on /dev/vdb  |
+--------------------------------------+--------------------------------------+-----------+------+------+
- Create backup of your selected volume:
Beware: If the volume is attached to an instance you’ll need to detach it first or use
--forcewhen creating the backup.
$ openstack volume backup create ce29137e-d7d7-45a6-ae63-bb6605af5335 --name mybackup --description "my backup" --force

+-----------+--------------------------------------+
| Field     | Value                                |
+-----------+--------------------------------------+
| id        | b014e2c4-42a9-44d5-af9b-60f3cf7ecfc9 |
| name      | mybackup                             |
| volume_id | ce29137e-d7d7-45a6-ae63-bb6605af5335 |
+-----------+--------------------------------------+
- When the backup is finished, the status will change from creating to available.
$ openstack volume backup list --volume ce29137e-d7d7-45a6-ae63-bb6605af5335

+--------------------------------------+----------+-------------+-----------+------+-------------+----------------------------+
| ID                                   | Name     | Description | Status    | Size | Incremental | Created At                 |
+--------------------------------------+----------+-------------+-----------+------+-------------+----------------------------+
| b014e2c4-42a9-44d5-af9b-60f3cf7ecfc9 | mybackup | my backup   | available |  100 | False       | 2026-01-23T11:18:01.000000 |
+--------------------------------------+----------+-------------+-----------+------+-------------+----------------------------+
Restore using cli
Restoring from backups can be done in two ways, one way is to create a new volume manually or to have the volume automatically created when restoring. Size must be at minimum the size of the backup.
Beware: If second option is chosen, the Availability Zone and Size gets chosen automatically. This means that the volume might end up in a different Availability Zone than intended. Volume size must be at minimum the size of the backup.
- List available backups:
$ openstack volume backup list

+--------------------------------------+----------+-------------+-----------+------+-------------+----------------------------+
| ID                                   | Name     | Description | Status    | Size | Incremental | Created At                 |
+--------------------------------------+----------+-------------+-----------+------+-------------+----------------------------+
| b014e2c4-42a9-44d5-af9b-60f3cf7ecfc9 | mybackup | my backup   | available |  100 | False       | 2026-01-23T11:18:01.000000 |
+--------------------------------------+----------+-------------+-----------+------+-------------+----------------------------+
- Create a new volume to restore from the backup:
$ openstack volume create my_volume_restore --availability-zone sto2 --type v2-4k --size 100 --description restored_from_backup

+--------------------------------+--------------------------------------+
| Field                          | Value                                |
+--------------------------------+--------------------------------------+
| attachments                    | []                                   |
| availability_zone              | sto2                                 |
| backup_id                      | None                                 |
| created_at                     | 2026-01-27T08:37:22.083078           |
| description                    | restored_from_backup                 |
| encrypted                      | False                                |
| group_id                       | None                                 |
| id                             | 6b5b8d28-d6c1-4da0-8659-d607670f5ed9 |
| multiattach                    | False                                |
| name                           | my_volume_restore                    |
| size                           | 100                                  |
| status                         | creating                             |
| type                           | v2-4k                                |
| updated_at                     | None                                 |
| volume_type_id                 | 565d82f0-238d-4f90-9aa4-172f0594bd58 |
+--------------------------------+--------------------------------------+
- Restore your selected backup to the newly created volume:
Beware: You’ll need to use –force to be able to restore backup to your newly created volume. Make sure to select the correct volume as this will overwrite any existing data.
$ openstack volume backup restore mybackup my_volume_restore --force

+-------------+--------------------------------------+
| Field       | Value                                |
+-------------+--------------------------------------+
| id          | b014e2c4-42a9-44d5-af9b-60f3cf7ecfc9 |
| volume_id   | 6b5b8d28-d6c1-4da0-8659-d607670f5ed9 |
| volume_name | my_volume_restore                    |
+-------------+--------------------------------------+
- After the backup is fully restored your new volume will show as: available.
$ openstack volume list

+--------------------------------------+-------------------+-----------+------+---------------------------------+
| ID                                   | Name              | Status    | Size | Attached to                     |
+--------------------------------------+-------------------+-----------+------+---------------------------------+
| 6b5b8d28-d6c1-4da0-8659-d607670f5ed9 | my_volume_restore | available |  100 |                                 |
| ce29137e-d7d7-45a6-ae63-bb6605af5335 | myvolume          | available |  100 |                                 |
+--------------------------------------+--------------------------------------+-----------+------+--------------+
Attach & Detach volumes from cli
Attach
List all available volumes:
$ openstack volume list --status available

+--------------------------------------+----------+--------+------+-------------------------------------+
| ID                                   | Name     | Status | Size | Attached to                         |
+--------------------------------------+----------+--------+------+-------------------------------------+
| ce29137e-d7d7-45a6-ae63-bb6605af5335 | myvolume | in-use |  100 | Attached to myinstance on /dev/vdb  |
+--------------------------------------+--------------------------------------+-----------+------+------+
- List all instances:
$ openstack server list

+--------------------------------------+------------+---------+--------------------------------+----------------------------+---------------+
| ID                                   | Name       | Status  | Networks                       | Image                      | Flavor        |
+--------------------------------------+------------+---------+--------------------------------+----------------------------+---------------+
| 3e55aef3-09a6-49e8-87ac-779354a1b7cd | myinstance | ACTIVE  | testnet=192.168.30.19          | ubuntu-24.04-server-latest | v2-c4-m8-d120 |
+--------------------------------------+------------+--------+---------------------------------+----------------------------+---------------+
- Attach your restored volume to an instance:
openstack server add volume <Instance ID/Name> <Volume ID/Name>
$ openstack server add volume myinstance my_volume_restore

+-----------------------+--------------------------------------+
| Field                 | Value                                |
+-----------------------+--------------------------------------+
| ID                    | 6b5b8d28-d6c1-4da0-8659-d607670f5ed9 |
| Server ID             | 3e55aef3-09a6-49e8-87ac-779354a1b7cd |
| Volume ID             | 6b5b8d28-d6c1-4da0-8659-d607670f5ed9 |
| Device                | /dev/vdb                             |
| Tag                   | None                                 |
| Delete On Termination | False                                |
+-----------------------+--------------------------------------+
- Confirm the attachment:
$ openstack volume list

+--------------------------------------+-------------------+-----------+------+-------------------------------------+
| ID                                   | Name              | Status    | Size | Attached to                         |
+--------------------------------------+-------------------+-----------+------+-------------------------------------+
| 6b5b8d28-d6c1-4da0-8659-d607670f5ed9 | my_volume_restore | in-use    |  100 | Attached to myinstance on /dev/vdb  |
| ce29137e-d7d7-45a6-ae63-bb6605af5335 | myvolume          | available |  100 |                                     |
+--------------------------------------+-------------------+-----------+------+-------------------------------------+
Detach
- Detach a volume from an instance:
openstack server remove volume <Instance ID/Name> <Volume ID/Name>.
$ openstack server remove volume myinstance my_volume_restore
- Confirm the detachment:
$ openstack volume list

+--------------------------------------+-------------------+-----------+------+---------------------------------+
| ID                                   | Name              | Status    | Size | Attached to                     |
+--------------------------------------+-------------------+-----------+------+---------------------------------+
| 6b5b8d28-d6c1-4da0-8659-d607670f5ed9 | my_volume_restore | available |  100 |                                 |
| ce29137e-d7d7-45a6-ae63-bb6605af5335 | myvolume          | available |  100 |                                 |
+--------------------------------------+--------------------------------------+---------------------------------+
Further reading
6.12.3 - Volume migration
Overview
To migrate volume data between Availability Zones (sto1|sto2|sto3) you can use Openstacks backup functionality. This backup process uses our Swift object storage, which is available across all Availability Zones.
- Shutdown the instance whose volume will change Availability Zone. Let’s say it’s in sto1 now.
- Take a backup of the volume (this may take some time, depending on the size of the volume).
- Create a new volume in Availability Zone sto2 and select the backup as the source.
- Create a new instance in Availability Zone sto2 and attach the newly created volume.
To get a more in-depth look at how to perform backup and restore of a volume, follow our Volume Backup & Restore guide.
6.12.4 - Volume Retype
Overview
This guide will help you getting started with changing volume type in OpenStack.
For v2 volumes as well as the deprecated ’enc’ volume types you will need to detach the volume from your server before retyping. Either shut down your server or unmount the volume in your operating system before detaching the volume in Openstack.
You cannot change a volume type from v1 to v2 if it has an existing snapshot.
Volume retype from Horizon
In this example, we will use a detached volume with the type 16k-IOPS-enc.
Navigate to “Project” → “Volumes” choose the volume you want to retype and press the ⬇ arrow next to Edit Volume and select Change Volume Type.
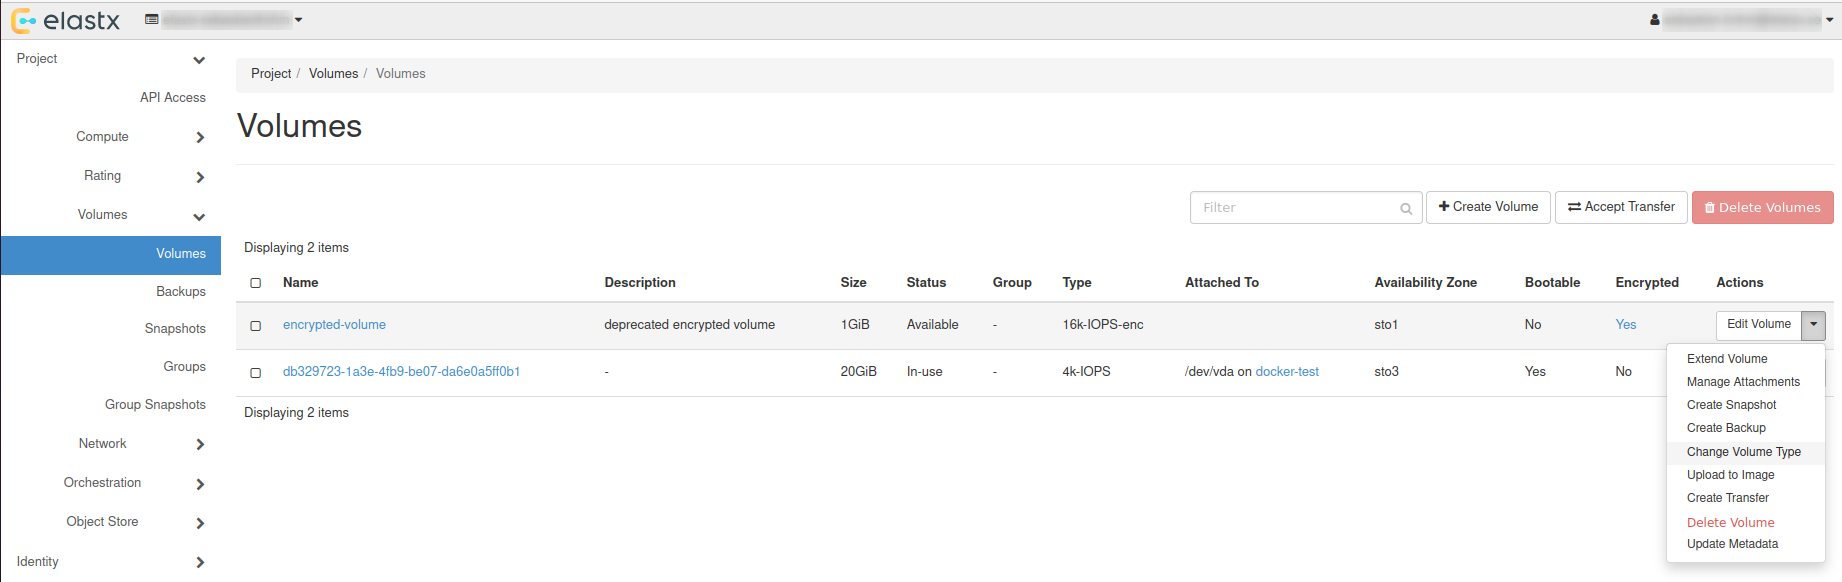
Choose Type
In the pop-up window, choose a new type and set Migration Policy to On Demand.
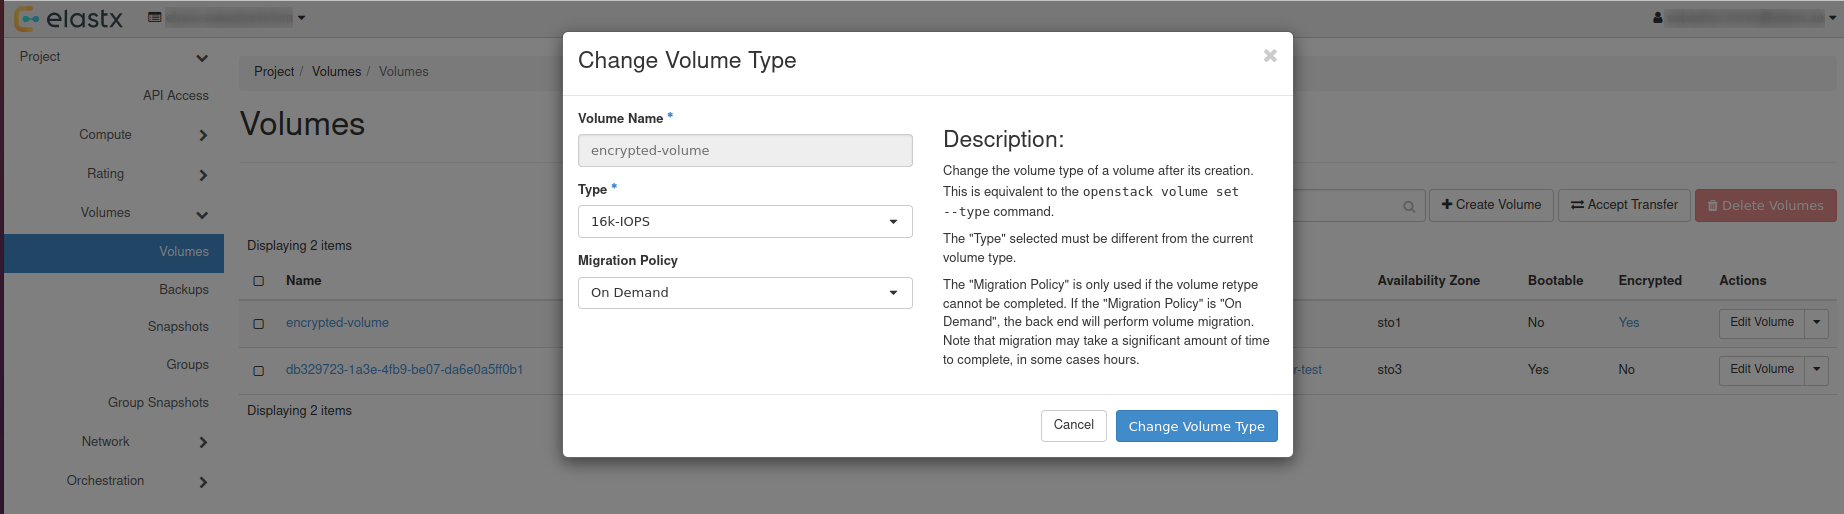
Check status
The volume status will change to retyping, this can take a while depending on the volume size.
After everything is done, the volume will have the status available.
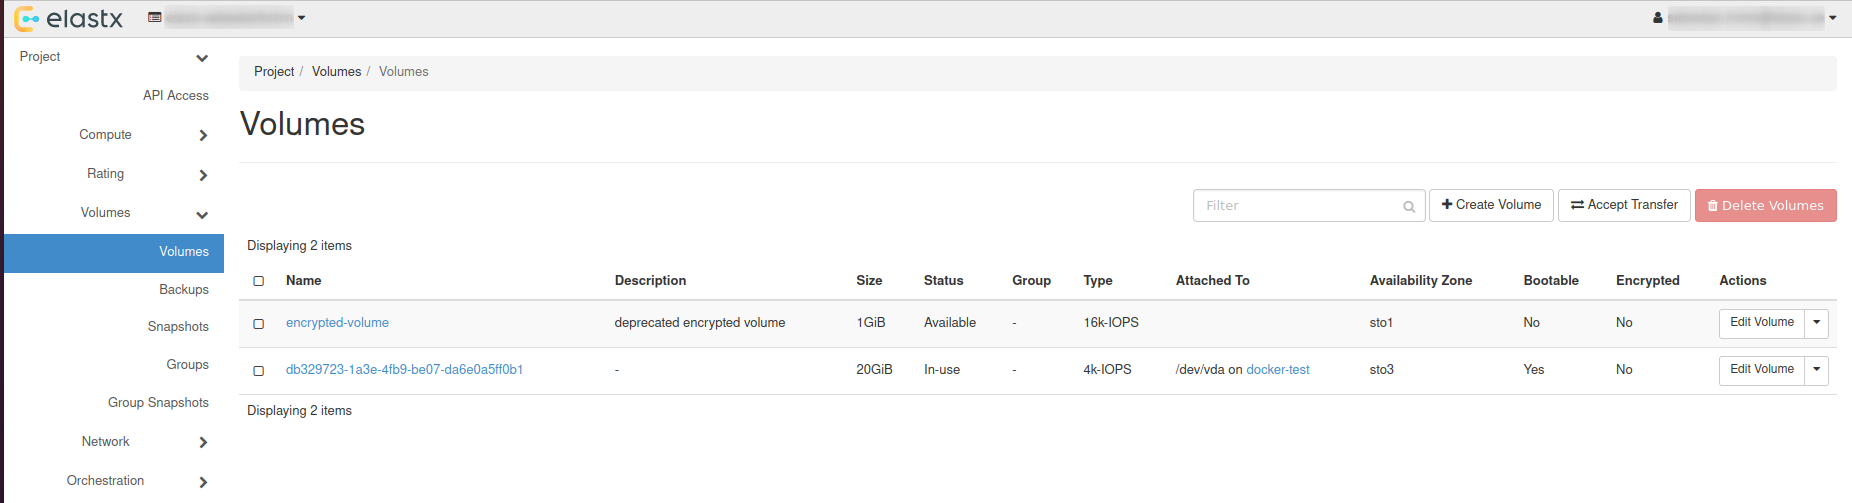
Volume retype using OpenStack CLI
List all available volumes: openstack volume list --long.
openstack volume list --long
+--------------------------------------+------------------+-----------+------+--------------+----------+--------------------------------------+--------------------------------------+
| ID                                   | Name             | Status    | Size | Type         | Bootable | Attached to                          | Properties                           |
+--------------------------------------+------------------+-----------+------+--------------+----------+--------------------------------------+--------------------------------------+
| ad2ca224-78e0-4930-941e-596bbea05b95 | encrypted-volume | available |    1 | 16k-IOPS-enc | false    |                                      |                                      |
| db329723-1a3e-4fb9-be07-da6e0a5ff0b1 |                  | in-use    |   20 | 4k-IOPS      | true     | Attached to docker-test on /dev/vda  | attached_mode='rw', readonly='False' |
+--------------------------------------+------------------+-----------+------+--------------+----------+--------------------------------------+--------------------------------------+
Retype volume with: openstack volume set --type <volume-type> --retype-policy on-demand <Volume ID or Name>.
openstack volume set --type 16k-IOPS --retype-policy on-demand ad2ca224-78e0-4930-941e-596bbea05b95

openstack volume list --long
+--------------------------------------+------------------+----------+------+--------------+----------+--------------------------------------+--------------------------------------+
| ID                                   | Name             | Status   | Size | Type         | Bootable | Attached to                          | Properties                           |
+--------------------------------------+------------------+----------+------+--------------+----------+--------------------------------------+--------------------------------------+
| ad2ca224-78e0-4930-941e-596bbea05b95 | encrypted-volume | retyping |    1 | 16k-IOPS-enc | false    |                                      |                                      |
| db329723-1a3e-4fb9-be07-da6e0a5ff0b1 |                  | in-use   |   20 | 4k-IOPS      | true     | Attached to docker-test on /dev/vda  | attached_mode='rw', readonly='False' |
+--------------------------------------+------------------+----------+------+--------------+----------+--------------------------------------+--------------------------------------+
When retyping is done, status will be shown as: available.
openstack volume list --long
+--------------------------------------+------------------+-----------+------+----------+----------+--------------------------------------+--------------------------------------+
| ID                                   | Name             | Status    | Size | Type     | Bootable | Attached to                          | Properties                           |
+--------------------------------------+------------------+-----------+------+----------+----------+--------------------------------------+--------------------------------------+
| ad2ca224-78e0-4930-941e-596bbea05b95 | encrypted-volume | available |    1 | 16k-IOPS | false    |                                      |                                      |
| db329723-1a3e-4fb9-be07-da6e0a5ff0b1 |                  | in-use    |   20 | 4k-IOPS  | true     | Attached to docker-test on /dev/vda  | attached_mode='rw', readonly='False' |
+--------------------------------------+------------------+-----------+------+----------+----------+--------------------------------------+--------------------------------------+
Further reading
6.12.5 - Windows volume offline after restart
Issue description
In certain circumstances, extra disks can be marked as offline after a hard reboot is performed and have to be manually brought online again.
By default Windows machines will have the SAN policy set to be “Offline Shared”, thus in most virtualization platforms this issue will occur when a disk is completely shut down and started again.
The reason behind this is that the disk may be assigned to a different virtual PCI device in the underlying host which causes the OS to block the volume from going online automatically when using the default policy.
Change SAN policy
The easiest way to change the SAN policy is using diskpart in a command shell or powershell prompt.
-
Enter diskpart
diskpart -
To display the current SAN policy, simply run the following command
san -
Change SAN policy
san policy=OnlineAll
Restore offline volume state
When attempting to initialize a volume you may be seeing the following error
The disk is offline because of policy set by an administrator
-
Start by listing disk information to find out which disk is offline.
list disk -
Select the offline disk.
select disk 1 -
Clear the read-only attribute for the selected disk.
attributes disk clear readonly -
To check that the read-only attribute has been cleared, run the following command.
attributes disk -
Bring the selected disk online again.
online disk