Terraform backend
Overview
This guide will help you getting started with creating datastores in Elastx DBaaS using Terraform.
We will be using the CCX provider and OAuth2 credentials.
You can read more about the CCX provider here.
Known Limitations
Currently only datastores can be deployed using the terraform provider. Database users and databases needs to be added through the UI.
DBaaS OAuth2 credentials
Before we get started with the CCX provider, we need to create a new set of OAuth2 credentials.
This can be done by logging into your DBaaS account –> Click on your Name and choose Account:

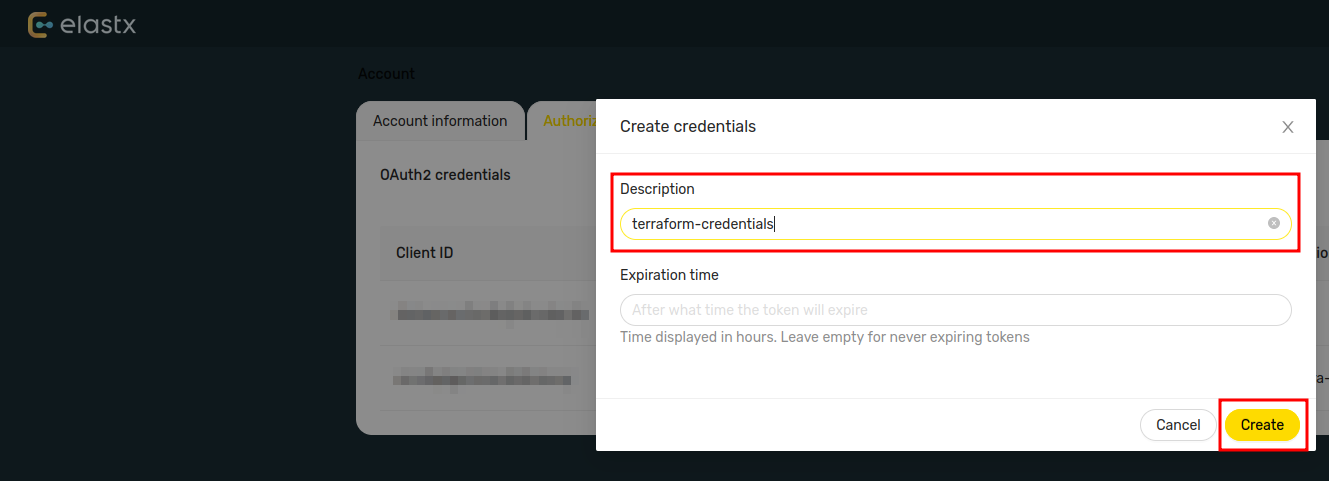
Select Authorization and choose Create Credentials:

Here you can add a description and set expiration date for your credentials.
Expiration date is based on the number of hours from when the credentials were created. If left empty, the credentials will not have an expiration date. You can however revoke and-/or remove your credentials at any time.
Copy the Client ID and Client Secret.
Beware: Make sure you’ve copied and saved the client secret before you close the dialog. The client secret value can not be obtained later and you will have to create new credentials.

Create a new file locally and add your credentials with the variables below.
#!/usr/bin/env bash

export CCX_BASE_URL="https://dbaas.elastx.cloud"
export CCX_CLIENT_ID="<client-id>"
export CCX_CLIENT_SECRET="<client_secret>"
Source your newly created credentials file.
source /path/to/myfile.sh
Terraform provider
Create a new terraform configuration file, for instance provider.tf and add the CCX provider.
terraform {
  required_providers {
    ccx = {
      source = "severalnines/ccx"
      version = "0.2.3"
    }
  }
}
Create your first datastore with Terraform
Create a new terraform configuration file, for instance main.tf and add a new resource with your datastore settings.
resource "ccx_datastore" "elastx-dbaas" {
  name           = "my-terraform-datastore"
  db_vendor      = "mariadb"
  instance_size  = "v1-c2-m8-d80"
  volume_type    = "v1-dynamic-40"
  volume_size    = "80"
  cloud_provider = "elastx"
  cloud_region   = "se-sto"
  tags           = ["terraform", "mariadb"]
}
Available options
Below you will find a table with available options you can choose from.
| Resource | Description |
|---|---|
name |
Required - Sets a name for your new datastore. |
db_vendor |
Required - Selects which database vendor you want to use. |
instance_size |
Required - Here you select which flavor you want to use. |
cloud_provider |
Required - Should be set to elastx. |
cloud_region |
Required - Should be set to se-sto. |
volume_type |
Recommended - This will create and use a volume as storage instead of the ephemeral disk that is included with the flavor. Volumes can later be resized from the web UI which is not possible with ephemeral storage. Select the volume type you want to use. You can select between v1-dynamic-40, 16k-IOPS and 8k-IOPS |
volume_size |
Recommended - Minimum volume size requirement is 80GB. |
size |
Optional - This is the size of your datastore cluster. Depending on the datastore type you can choose between: 1 (single node), 2 (two nodes), 3 (three nodes). Defaults to 1. |
tags |
Optional - Add additional tags. |