Volume Backup & Restore
Overview
Volume backups in Elastx OpenStack uses Swift as the storage backend. This means that your backups will automatically be placed in all availability zones. This guide will help you get started with how to create volume backups and how to restore them using OpenStack’s Horizon and CLI.
Backup and restrore from Horizon
Backup from Horizon
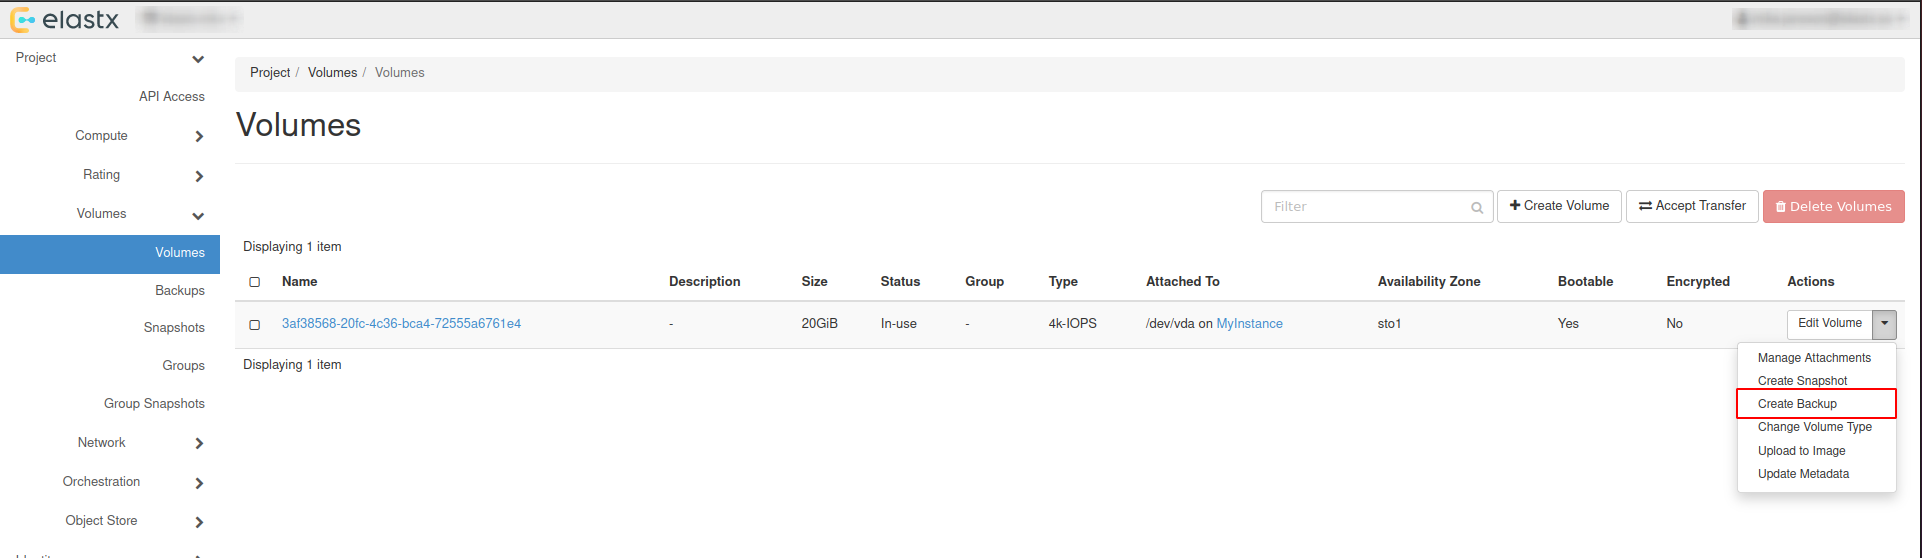
- Navigate to “Project” → “Volumes” pick the volume you want to backup and choose
Create Backup
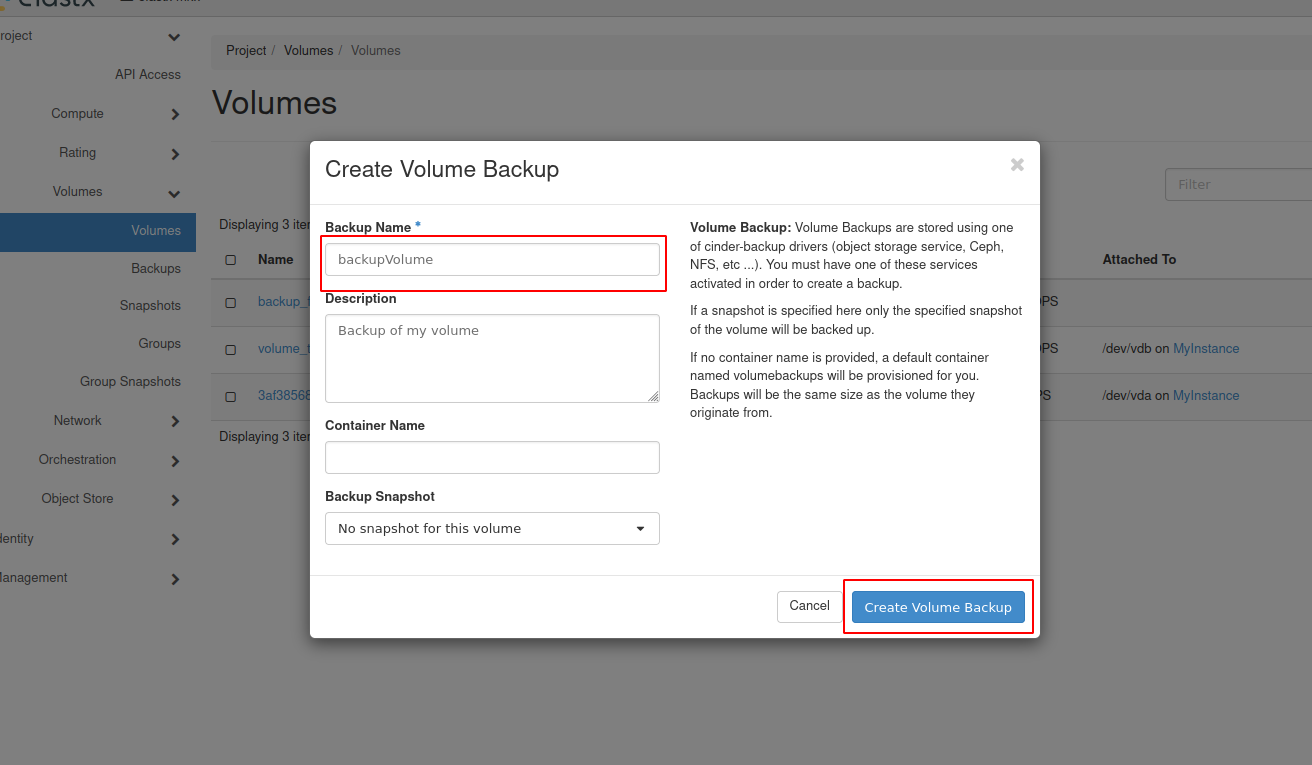
- In the pop-up window, add a name and a description of your liking and press
Create Volume Backup.
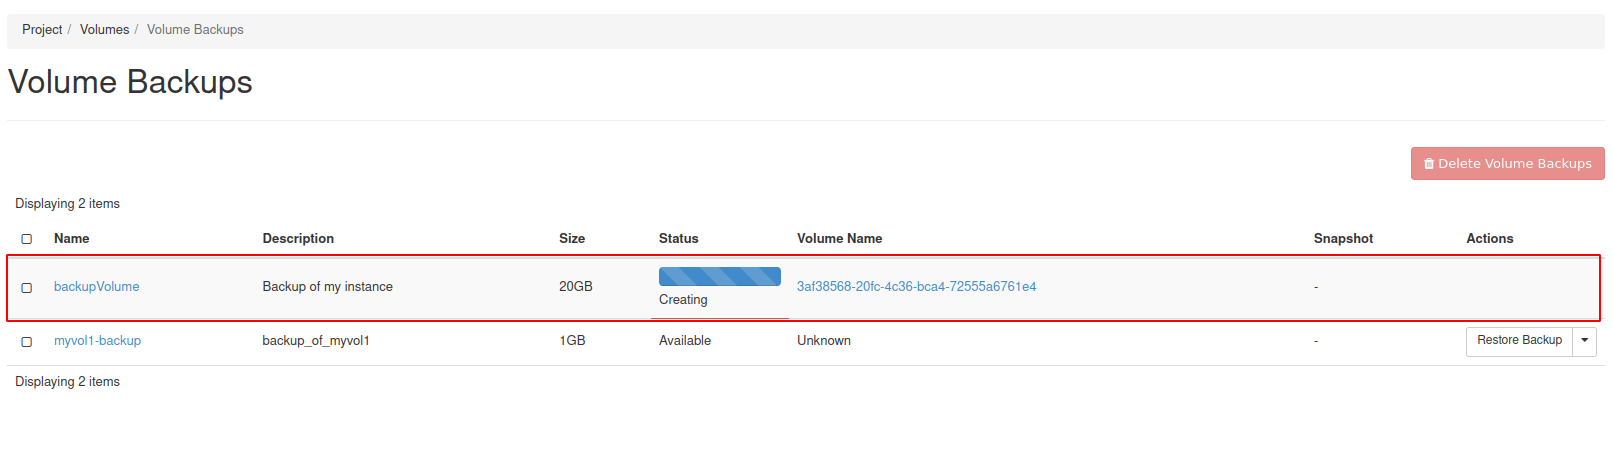
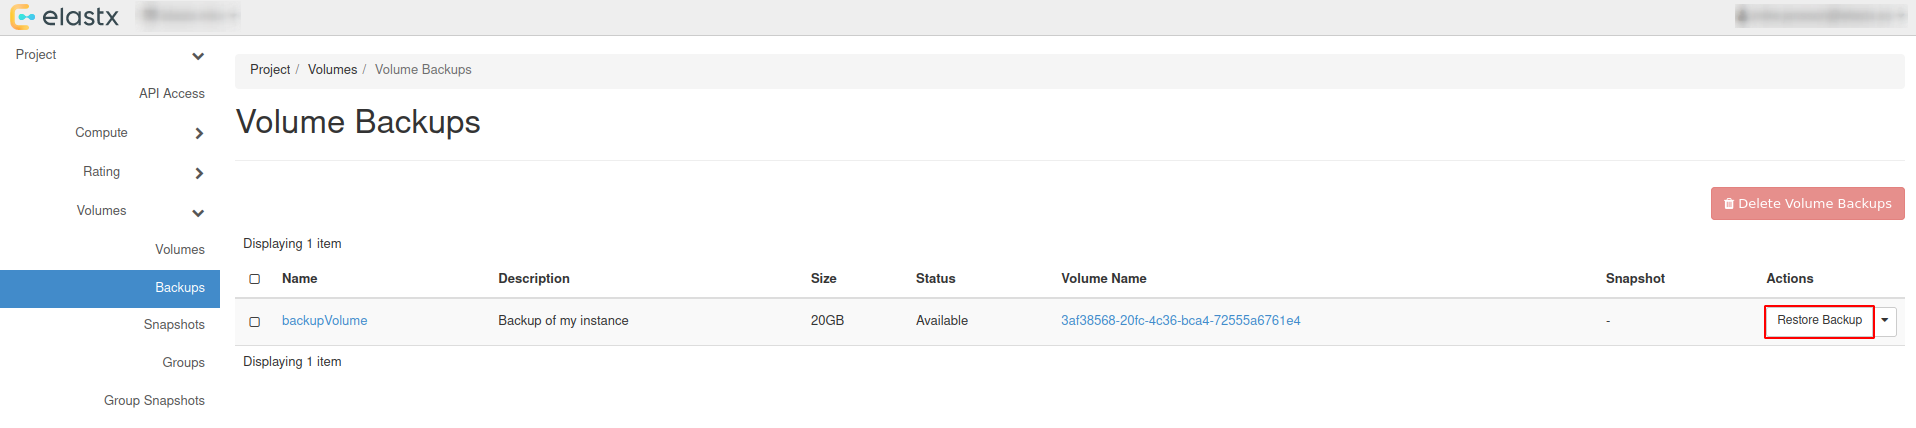
- Navigate to “Project” → “Volumes” → “Backups” to see the backup status.
Restore from horizon
Restoring from backups can be done in two ways, one way is to create a new volume manually from the “Project” → “Volumes”, or to have the volume automatically created when restoring from the “Project” → “Volumes” → “Backups”.
Beware: If option two is chosen, the Availability Zone and Size gets chosen automatically. This means that the volume might end up in a different Availability Zone than intended.
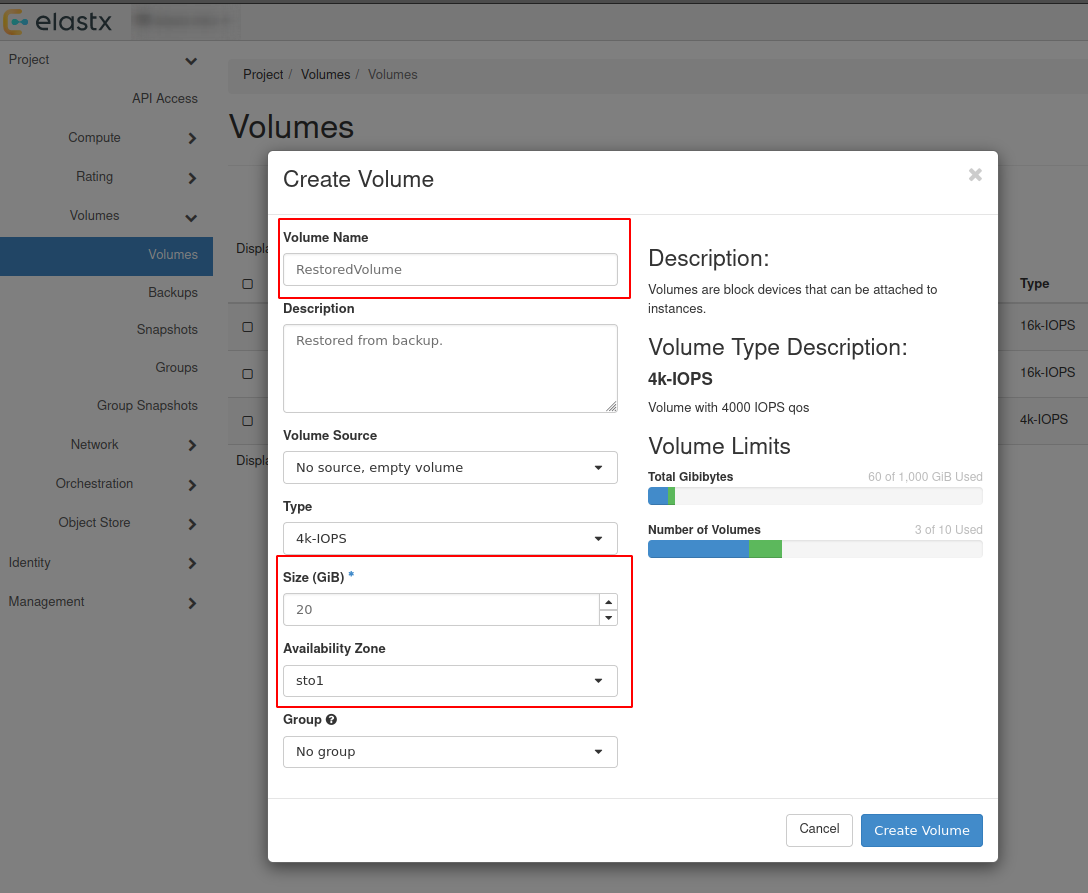
Option #1 - Create volume and restore from backup
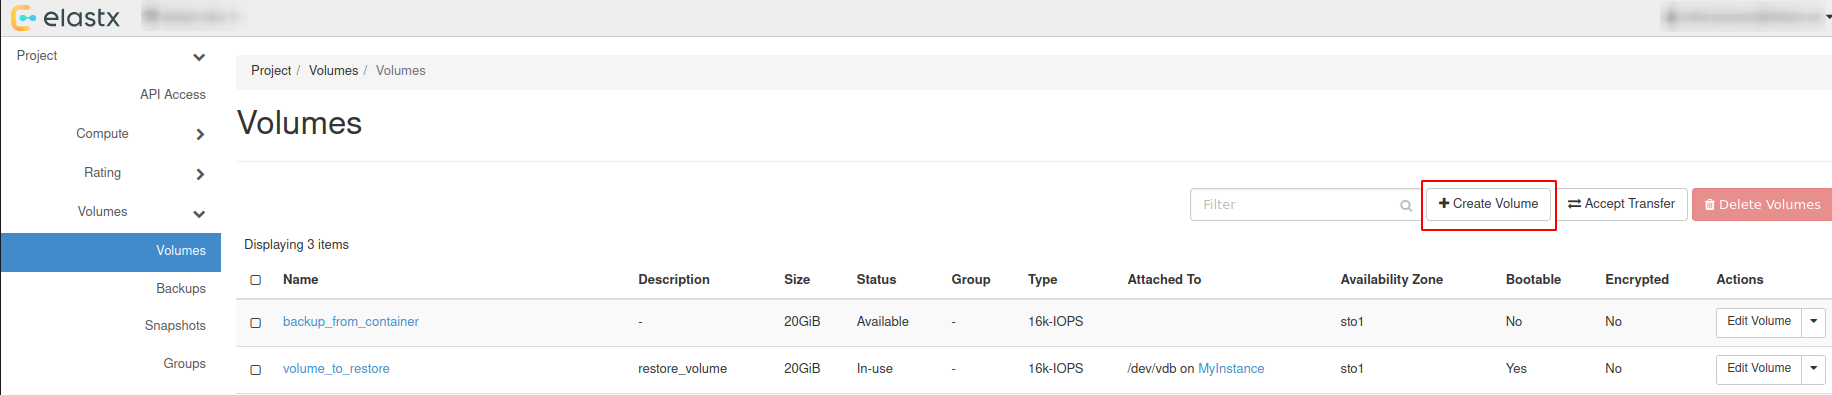
- Navigate to “Project” → “Volumes” and press
Create Volume.
- Choose a name, description and size of your liking for the new volume.
Beware: Volume Size has to be at minimum the size of the backup. The Volume also has to be in the same Availability Zone as the instance it will be attached too.
- Navigate to “Project” → “Volumes” → “Backups” and press
Restore Backup.
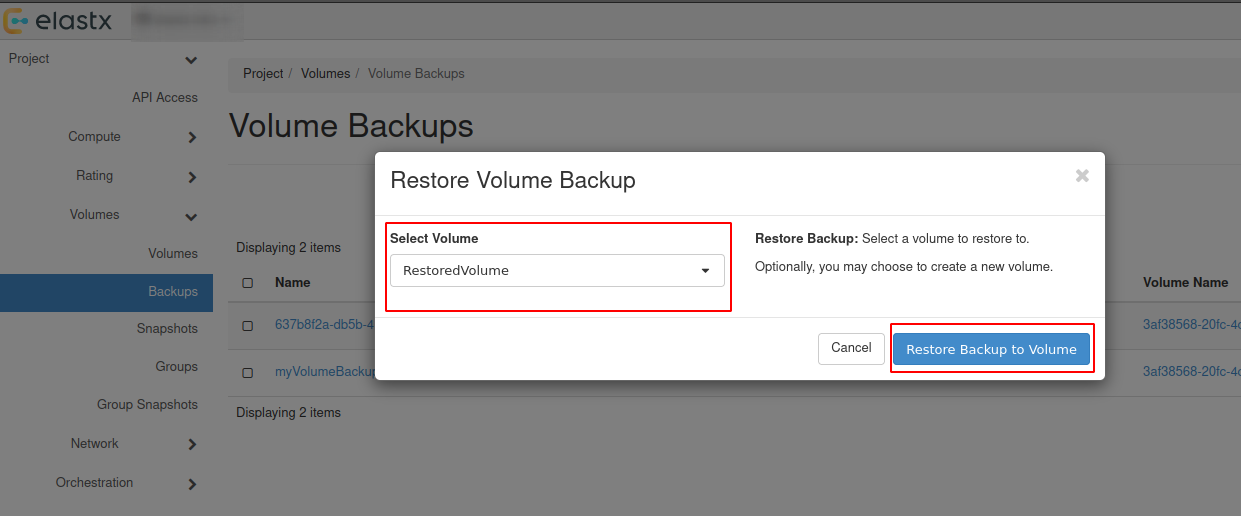
- Select your newly created volume and press
Restore Backup to Volume.
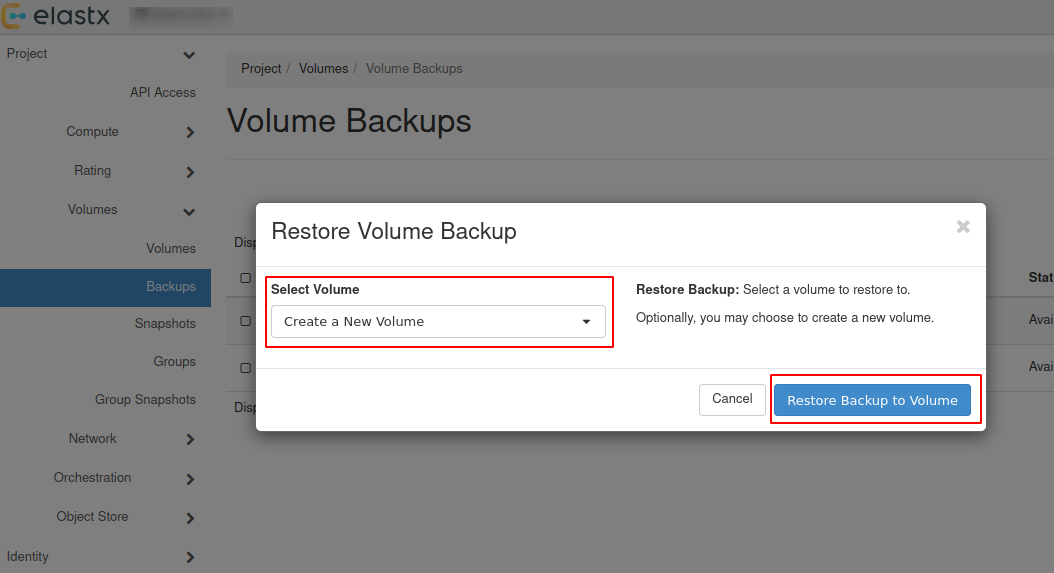
Option #2 - Restore backup without selecting a volume
Beware: See the note about availability zones and sizes above.
- Navigate to “Project” → “Volumes” → “Backups” and press
Restore Backup.
- Select
Create a New Volumeand pressRestore Backup to Volume.
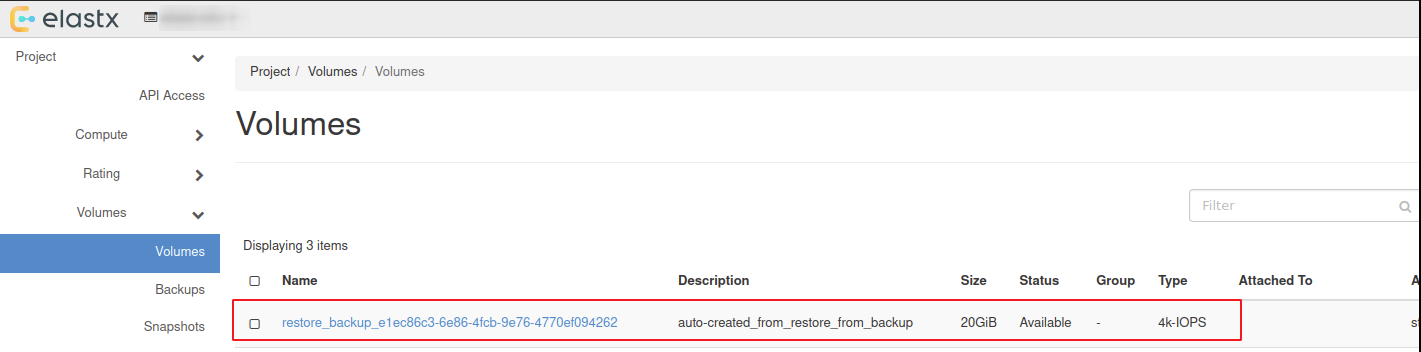
- The restored backup will be available in “Project” → “Volumes”.
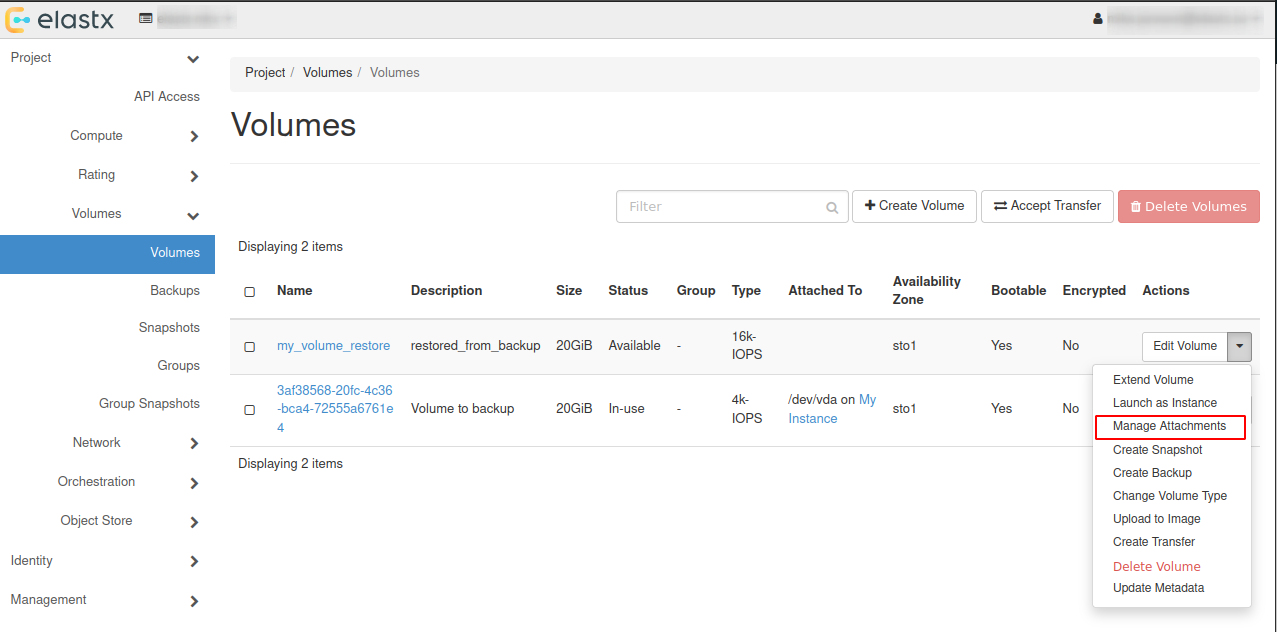
Attach & Detach volumes from horizon
- Navigate to “Project” → “Volumes” and press the ⬇ arrow next to
Edit Volumeon the volume you want to attach and then pressManage Attachments
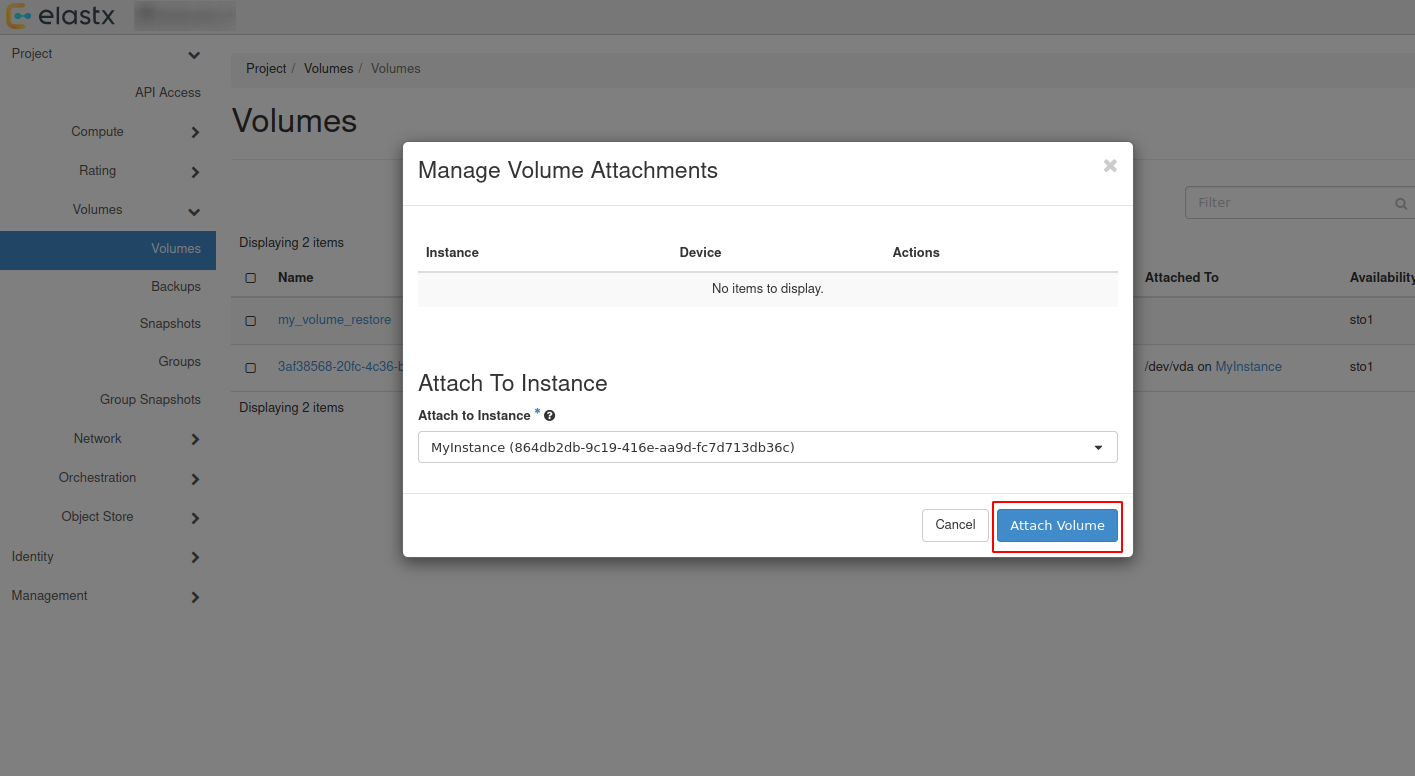
- In the pop-up window choose an instance you want to attach the restored volume to.
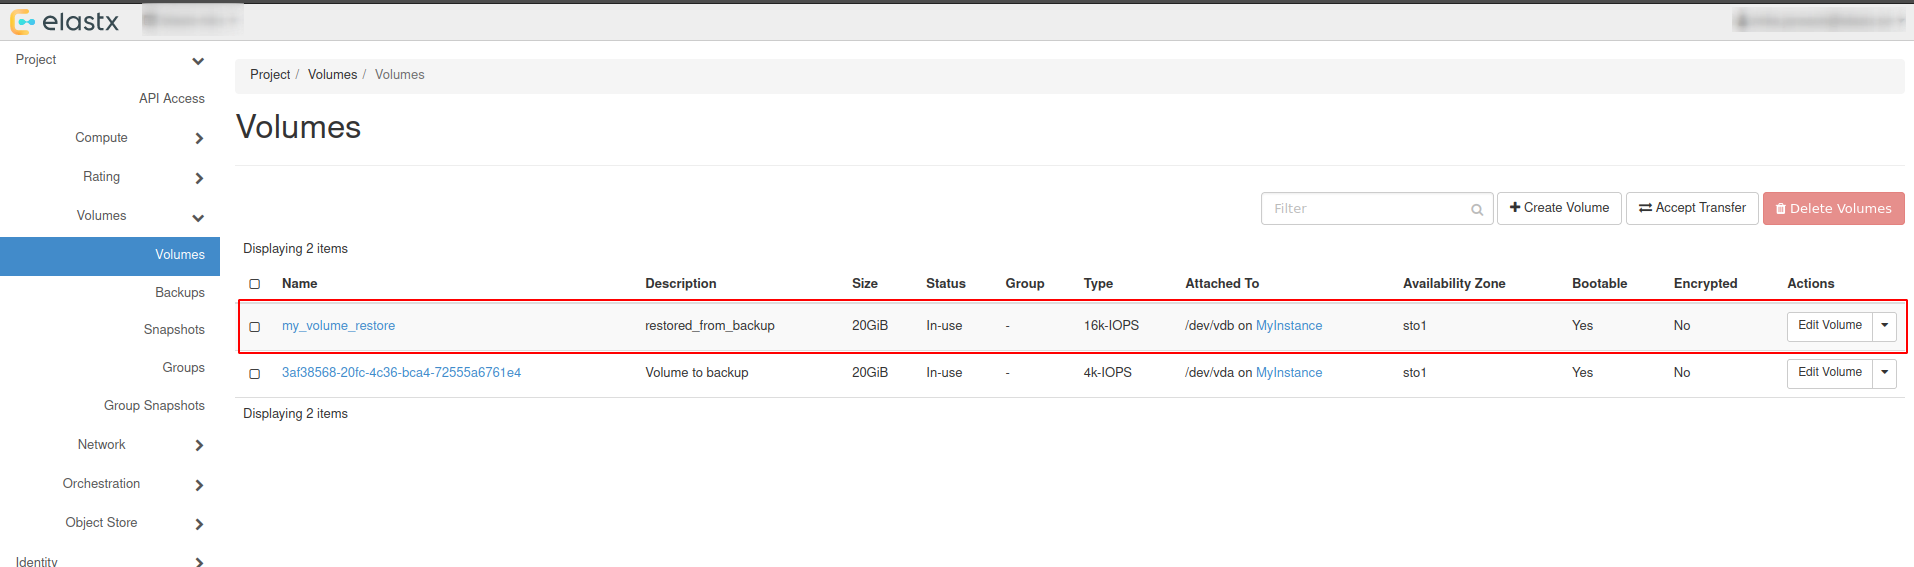
- Check volumes again in “Project” → “Volumes” to see if the volume is attached to the instance.
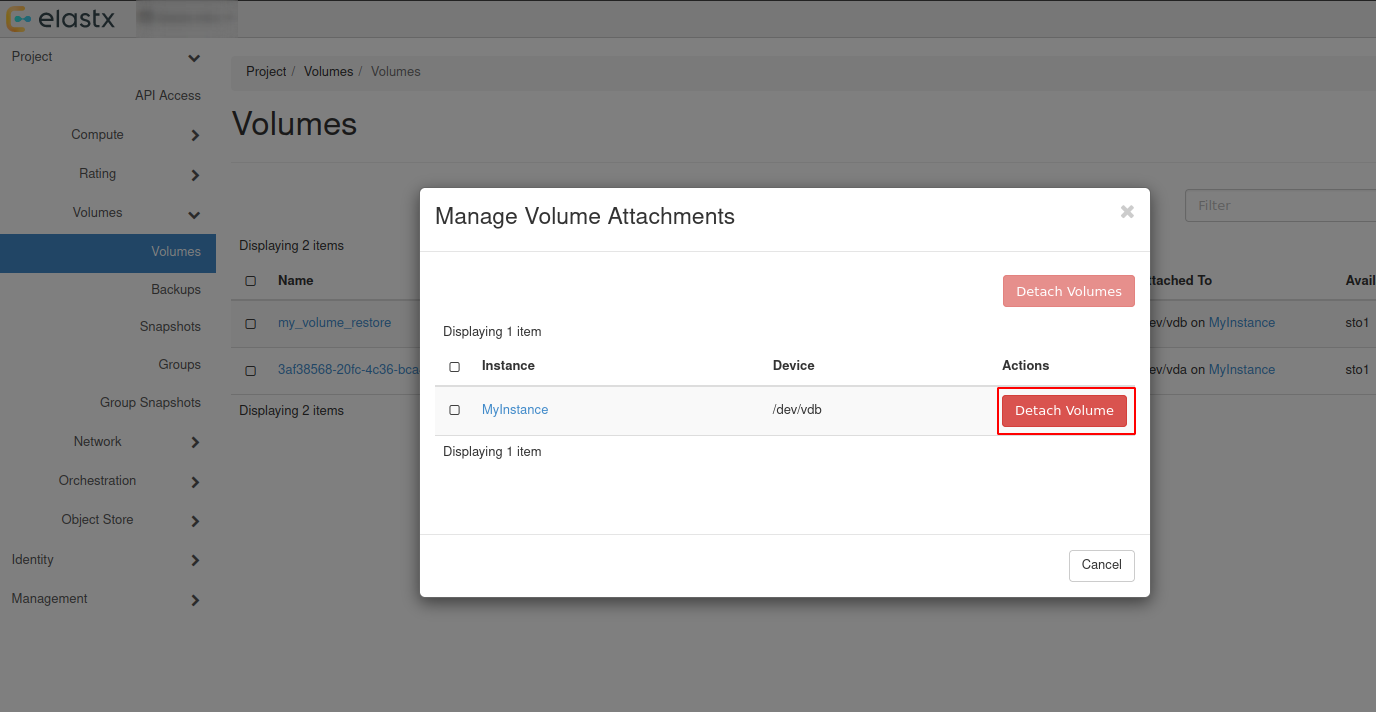
- To detach the volume, Navigate to “Project” → “Volumes” and press the ⬇ arrow next to
Edit Volumeon the volume you want to detach and then pressManage Attachments. In the pop-up window choose the instance you want to detach the volume from.
Backup and restore using openstack-cli
Backup using cli
- List all volumes:
$ openstack volume list

+--------------------------------------+----------+--------+------+-------------------------------------+
| ID                                   | Name     | Status | Size | Attached to                         |
+--------------------------------------+----------+--------+------+-------------------------------------+
| ce29137e-d7d7-45a6-ae63-bb6605af5335 | myvolume | in-use |  100 | Attached to myinstance on /dev/vdb  |
+--------------------------------------+--------------------------------------+-----------+------+------+
- Create backup of your selected volume:
Beware: If the volume is attached to an instance you’ll need to detach it first or use
--forcewhen creating the backup.
$ openstack volume backup create ce29137e-d7d7-45a6-ae63-bb6605af5335 --name mybackup --description "my backup" --force

+-----------+--------------------------------------+
| Field     | Value                                |
+-----------+--------------------------------------+
| id        | b014e2c4-42a9-44d5-af9b-60f3cf7ecfc9 |
| name      | mybackup                             |
| volume_id | ce29137e-d7d7-45a6-ae63-bb6605af5335 |
+-----------+--------------------------------------+
- When the backup is finished, the status will change from creating to available.
$ openstack volume backup list --volume ce29137e-d7d7-45a6-ae63-bb6605af5335

+--------------------------------------+----------+-------------+-----------+------+-------------+----------------------------+
| ID                                   | Name     | Description | Status    | Size | Incremental | Created At                 |
+--------------------------------------+----------+-------------+-----------+------+-------------+----------------------------+
| b014e2c4-42a9-44d5-af9b-60f3cf7ecfc9 | mybackup | my backup   | available |  100 | False       | 2026-01-23T11:18:01.000000 |
+--------------------------------------+----------+-------------+-----------+------+-------------+----------------------------+
Restore using cli
Restoring from backups can be done in two ways, one way is to create a new volume manually or to have the volume automatically created when restoring. Size must be at minimum the size of the backup.
Beware: If second option is chosen, the Availability Zone and Size gets chosen automatically. This means that the volume might end up in a different Availability Zone than intended. Volume size must be at minimum the size of the backup.
- List available backups:
$ openstack volume backup list

+--------------------------------------+----------+-------------+-----------+------+-------------+----------------------------+
| ID                                   | Name     | Description | Status    | Size | Incremental | Created At                 |
+--------------------------------------+----------+-------------+-----------+------+-------------+----------------------------+
| b014e2c4-42a9-44d5-af9b-60f3cf7ecfc9 | mybackup | my backup   | available |  100 | False       | 2026-01-23T11:18:01.000000 |
+--------------------------------------+----------+-------------+-----------+------+-------------+----------------------------+
- Create a new volume to restore from the backup:
$ openstack volume create my_volume_restore --availability-zone sto2 --type v2-4k --size 100 --description restored_from_backup

+--------------------------------+--------------------------------------+
| Field                          | Value                                |
+--------------------------------+--------------------------------------+
| attachments                    | []                                   |
| availability_zone              | sto2                                 |
| backup_id                      | None                                 |
| created_at                     | 2026-01-27T08:37:22.083078           |
| description                    | restored_from_backup                 |
| encrypted                      | False                                |
| group_id                       | None                                 |
| id                             | 6b5b8d28-d6c1-4da0-8659-d607670f5ed9 |
| multiattach                    | False                                |
| name                           | my_volume_restore                    |
| size                           | 100                                  |
| status                         | creating                             |
| type                           | v2-4k                                |
| updated_at                     | None                                 |
| volume_type_id                 | 565d82f0-238d-4f90-9aa4-172f0594bd58 |
+--------------------------------+--------------------------------------+
- Restore your selected backup to the newly created volume:
Beware: You’ll need to use –force to be able to restore backup to your newly created volume. Make sure to select the correct volume as this will overwrite any existing data.
$ openstack volume backup restore mybackup my_volume_restore --force

+-------------+--------------------------------------+
| Field       | Value                                |
+-------------+--------------------------------------+
| id          | b014e2c4-42a9-44d5-af9b-60f3cf7ecfc9 |
| volume_id   | 6b5b8d28-d6c1-4da0-8659-d607670f5ed9 |
| volume_name | my_volume_restore                    |
+-------------+--------------------------------------+
- After the backup is fully restored your new volume will show as: available.
$ openstack volume list

+--------------------------------------+-------------------+-----------+------+---------------------------------+
| ID                                   | Name              | Status    | Size | Attached to                     |
+--------------------------------------+-------------------+-----------+------+---------------------------------+
| 6b5b8d28-d6c1-4da0-8659-d607670f5ed9 | my_volume_restore | available |  100 |                                 |
| ce29137e-d7d7-45a6-ae63-bb6605af5335 | myvolume          | available |  100 |                                 |
+--------------------------------------+--------------------------------------+-----------+------+--------------+
Attach & Detach volumes from cli
Attach
List all available volumes:
$ openstack volume list --status available

+--------------------------------------+----------+--------+------+-------------------------------------+
| ID                                   | Name     | Status | Size | Attached to                         |
+--------------------------------------+----------+--------+------+-------------------------------------+
| ce29137e-d7d7-45a6-ae63-bb6605af5335 | myvolume | in-use |  100 | Attached to myinstance on /dev/vdb  |
+--------------------------------------+--------------------------------------+-----------+------+------+
- List all instances:
$ openstack server list

+--------------------------------------+------------+---------+--------------------------------+----------------------------+---------------+
| ID                                   | Name       | Status  | Networks                       | Image                      | Flavor        |
+--------------------------------------+------------+---------+--------------------------------+----------------------------+---------------+
| 3e55aef3-09a6-49e8-87ac-779354a1b7cd | myinstance | ACTIVE  | testnet=192.168.30.19          | ubuntu-24.04-server-latest | v2-c4-m8-d120 |
+--------------------------------------+------------+--------+---------------------------------+----------------------------+---------------+
- Attach your restored volume to an instance:
openstack server add volume <Instance ID/Name> <Volume ID/Name>
$ openstack server add volume myinstance my_volume_restore

+-----------------------+--------------------------------------+
| Field                 | Value                                |
+-----------------------+--------------------------------------+
| ID                    | 6b5b8d28-d6c1-4da0-8659-d607670f5ed9 |
| Server ID             | 3e55aef3-09a6-49e8-87ac-779354a1b7cd |
| Volume ID             | 6b5b8d28-d6c1-4da0-8659-d607670f5ed9 |
| Device                | /dev/vdb                             |
| Tag                   | None                                 |
| Delete On Termination | False                                |
+-----------------------+--------------------------------------+
- Confirm the attachment:
$ openstack volume list

+--------------------------------------+-------------------+-----------+------+-------------------------------------+
| ID                                   | Name              | Status    | Size | Attached to                         |
+--------------------------------------+-------------------+-----------+------+-------------------------------------+
| 6b5b8d28-d6c1-4da0-8659-d607670f5ed9 | my_volume_restore | in-use    |  100 | Attached to myinstance on /dev/vdb  |
| ce29137e-d7d7-45a6-ae63-bb6605af5335 | myvolume          | available |  100 |                                     |
+--------------------------------------+-------------------+-----------+------+-------------------------------------+
Detach
- Detach a volume from an instance:
openstack server remove volume <Instance ID/Name> <Volume ID/Name>.
$ openstack server remove volume myinstance my_volume_restore
- Confirm the detachment:
$ openstack volume list

+--------------------------------------+-------------------+-----------+------+---------------------------------+
| ID                                   | Name              | Status    | Size | Attached to                     |
+--------------------------------------+-------------------+-----------+------+---------------------------------+
| 6b5b8d28-d6c1-4da0-8659-d607670f5ed9 | my_volume_restore | available |  100 |                                 |
| ce29137e-d7d7-45a6-ae63-bb6605af5335 | myvolume          | available |  100 |                                 |
+--------------------------------------+--------------------------------------+---------------------------------+